

One of the most overlooked and misunderstood aspects of drumming is drum tuning. While drums generally aren’t tuned to specific pitches, they do need to be tuned to produce clear, full tones.
Learning how to tune a drum set will make you sound better and encourage you to play more often. With the proper tuning, even a beginner drum kit can sound great.
Click a section below to learn more about how to tune your drums
What you need before tuning your drums
When learning how to tune a drum set, you’ll need a couple basic items:
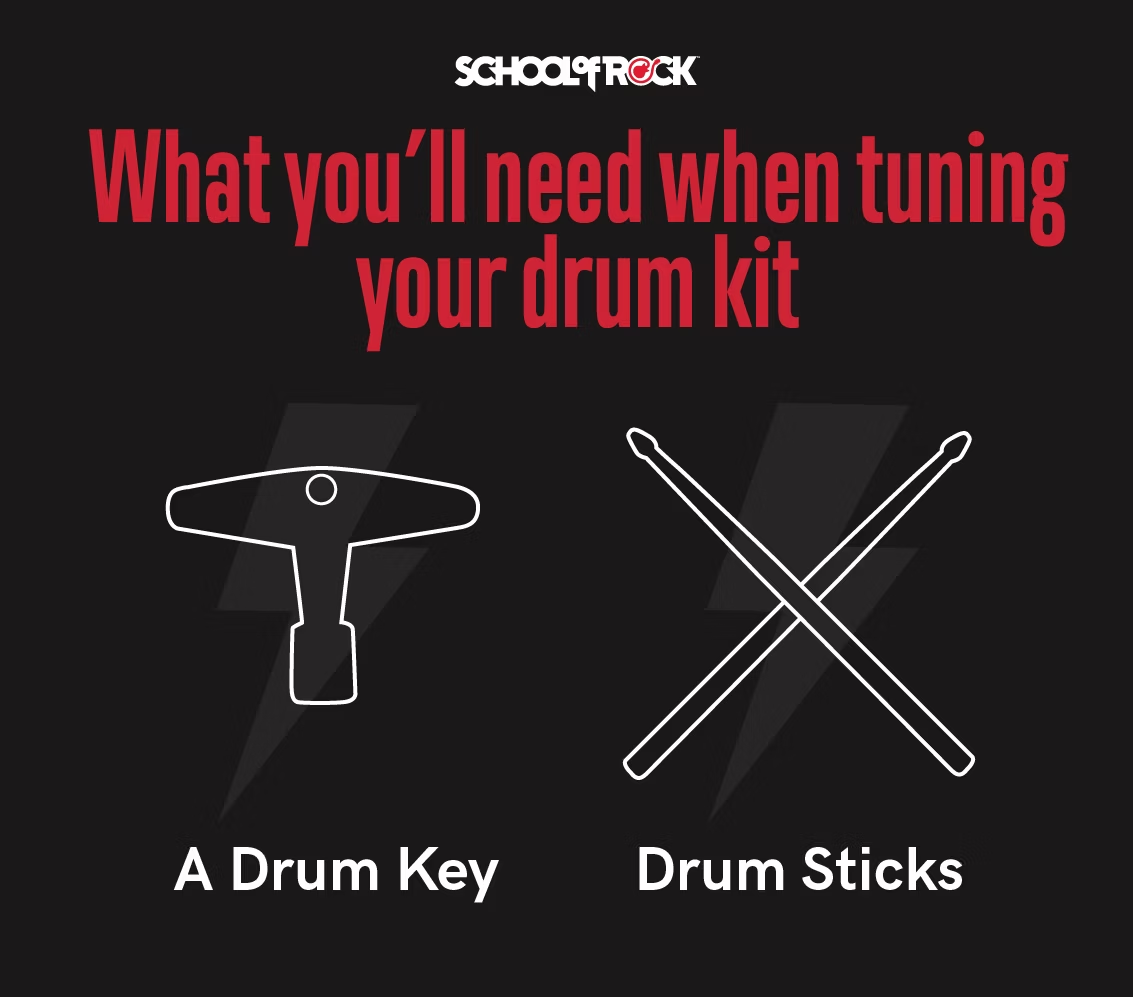
- A drum key. The first thing you’ll need when learning how to tune your drums is a drum key. A drum key is a small tool that’s used to tighten or loosen the tension rods that control the pitch of the drum.
Tightening the tension rods causes the pitch of the drum to go up; loosening the tension rods will lower the pitch. Drum keys can also be used to adjust hardware such as hi-hat stands and kick drum pedals. - A drum stick. You’ll need drumsticks to tap on the heads as you tune them.
Pro tip: Always have your drum key!
While it’s not required, some drummers use two drum keys when tuning drum heads so they can tune opposing sides of the head at the same time, giving them equal tension. Professional drum techs (the people who know how to tune a drum set and maintain one for professional level bands) sometimes employ a turntable, which allows them to rotate the drums easily as they adjust the drum’s tuning.
The parts of a drum
Drums are a percussion instrument. Their sound is produced when a drum head is struck either by hand or with a stick or mallet. People have been playing drums for thousands of years, but what we think of as the modern drum set wasn’t developed until around the 1920s.
With the advent of the kick drum pedal and the development of the hi-hat, drummers finally had everything they needed to drive a band. The drums themselves evolved from animal skin heads attached with rope to a modern system that uses multiple parts. Now, there are many different types of drums to choose from!
To fully understand how drums work, you’ll first need to understand what their different drum parts are and what they do.
Note each of the following as you put together your drum set:

Drum hoops
The drum hoop is a round piece of metal that holds the heads onto the drum. Snare drum and kick drum hoops are sometimes made of wood. Each drum usually has a top and a bottom hoop, one for each of the drum heads.
Drum shell
The shell is the wood body of the drum. Maple, birch, oak, cherry, and mahogany are common woods used for drums. Each type of wood produces a slightly different tone. Some drums have a natural, stained wood finish, and others have a “wrap,” a colored synthetic material that’s very durable. Snare drum shells can also be made of metal. This gives them a louder and brighter tone.
Tension rods
The tension rods are placed through the hoops and tightened or loosened to achieve the sound that you want. One end of the tension rod is threaded; the other end has a square head. As you might guess, the tension rods provide tension on the drum heads. When tuning drum heads, you’ll need to adjust this tension evenly across all the tension rods. If one part of the drum is loose and another is tight, the drum won’t produce a good tone.
Drum lugs
The lugs are attached to the shell of the drum, and the threaded part of the tension rod is inserted into the lug. Most drums will have eight or 10 lugs. Some older vintage drums may have six lugs. The number of lugs can affect the tuning stability and the sound of the drum.
Drum claws
Bass drums have drum claws. The claws are metal pieces that fit over the hoops to secure the hoops to the shell. The tension rods are placed through the holes in the claws and then threaded into the lugs and tightened.
Bottom (resonant) drum head
The bottom head of the drum is called the resonant head. The resonant head will shape the overtones, or resonance, of the drum. Thinner resonant heads are more sensitive, while thicker resonant heads are darker sounding. Since the resonant head isn’t directly struck, they can last longer than the top heads, but eventually, they’ll wear out and need replacement.
Top (batter) drum head
The top head is called the batter head. It controls the attack and “ring” (the unwanted overtones) of the drum. Batter heads may be single or double-ply. Single-ply heads are louder and brighter but have less durability than double-ply heads. Batter heads can also be coated or uncoated. Coated heads generally sound a little “drier” and darker.
Vents
Vents may be easily overlooked, but they’re actually very important when thinking about how drums work. These little air holes are built into drums and allow air to escape the drum shell when the drums are hit. This allows the drums to “breathe” as the vibrations of the heads resonate. The vents also improve the stick feel of the drum.
How to tune your drums step by step
Tuning your drums only takes a few minutes, but it’s well worth the time you put in. You’ll love your sound, and all it takes is following a few basic steps.
1. Decide if you’re starting with a new drum head or tuning your old one
As you practice, you may notice the tone of the drums changing. The more you play, the more your knowledge of how to tune a drum set will come in handy. After extensive use, the drum heads will need to be replaced. The old heads won’t hold tune as well, and eventually, they’ll wear out and break.
There are many types of heads, so what type of head should you use? Each type of head produces a different tone, and some are more durable than others. Drum heads are generally made of different types of plastic:
- Single-ply: Single-ply drum heads are the most common type of head. They produce a brighter sound and are the least durable type of head. This type of drum head is good for jazz and light rock.
- Double-ply: Double-ply drum heads sound darker and are better for heavy metal music and heavier, louder styles. They have a darker sound and are more durable.
- Coated heads: Coated drum heads have a sprayed-on coating that darkens the tone of the drum and reduces the amount of “ring” or overtones. They’re also more durable than uncoated, or clear, heads. Coated heads can be single- or double-ply.
- Pre-dampened heads: Pre-dampened drum heads have a built-in dampening system to control the overtones of the drum. These are also referred to as mufflers and are most found on kick drums. They produce a very controlled, focused sound with less overtones.
If you play on a regular basis, it’s a good idea to change your batter heads every six months to a year. The snare drum is hit the most often, so it may need replacing more often. Kick drum heads generally last the longest. Resonant heads don’t need to be replaced as often as batter heads; you can usually change them every second or third time you change your batter heads.
How to change drum heads
When it’s time to change heads, the old heads will need to be removed by loosening the tension rods and removing the hoops. Be careful to keep track of all the tension rods and claws. Once you remove the hoops and rods, take a cloth and wipe the edge of the drum shell to remove any dust.
Then place the new head on the shell of the drum. You want to center the new head to make sure it sits evenly on the drum so it can be tuned to equal tension across the drum. Place the hoop over the head and then insert the rods into the hole in the hoop and thread them into the lugs. Tighten them until they are just finger-tight.
2. Center your drum head
When you place the new head on the shell, spin it around to make sure it’s centered on the drum. Once the head is centered, place the hoop over the head and line it up with the lugs on the side of the shell. Thread the tension rods and tighten them until finger-tight.

How tight should you tune your drum?
When first learning how to tune a drum set, be careful not to overtighten the heads. Most beginners tend to tune their drums too high and “choke” the tone of the drum. You want the drums to ring out clearly with an even tone.
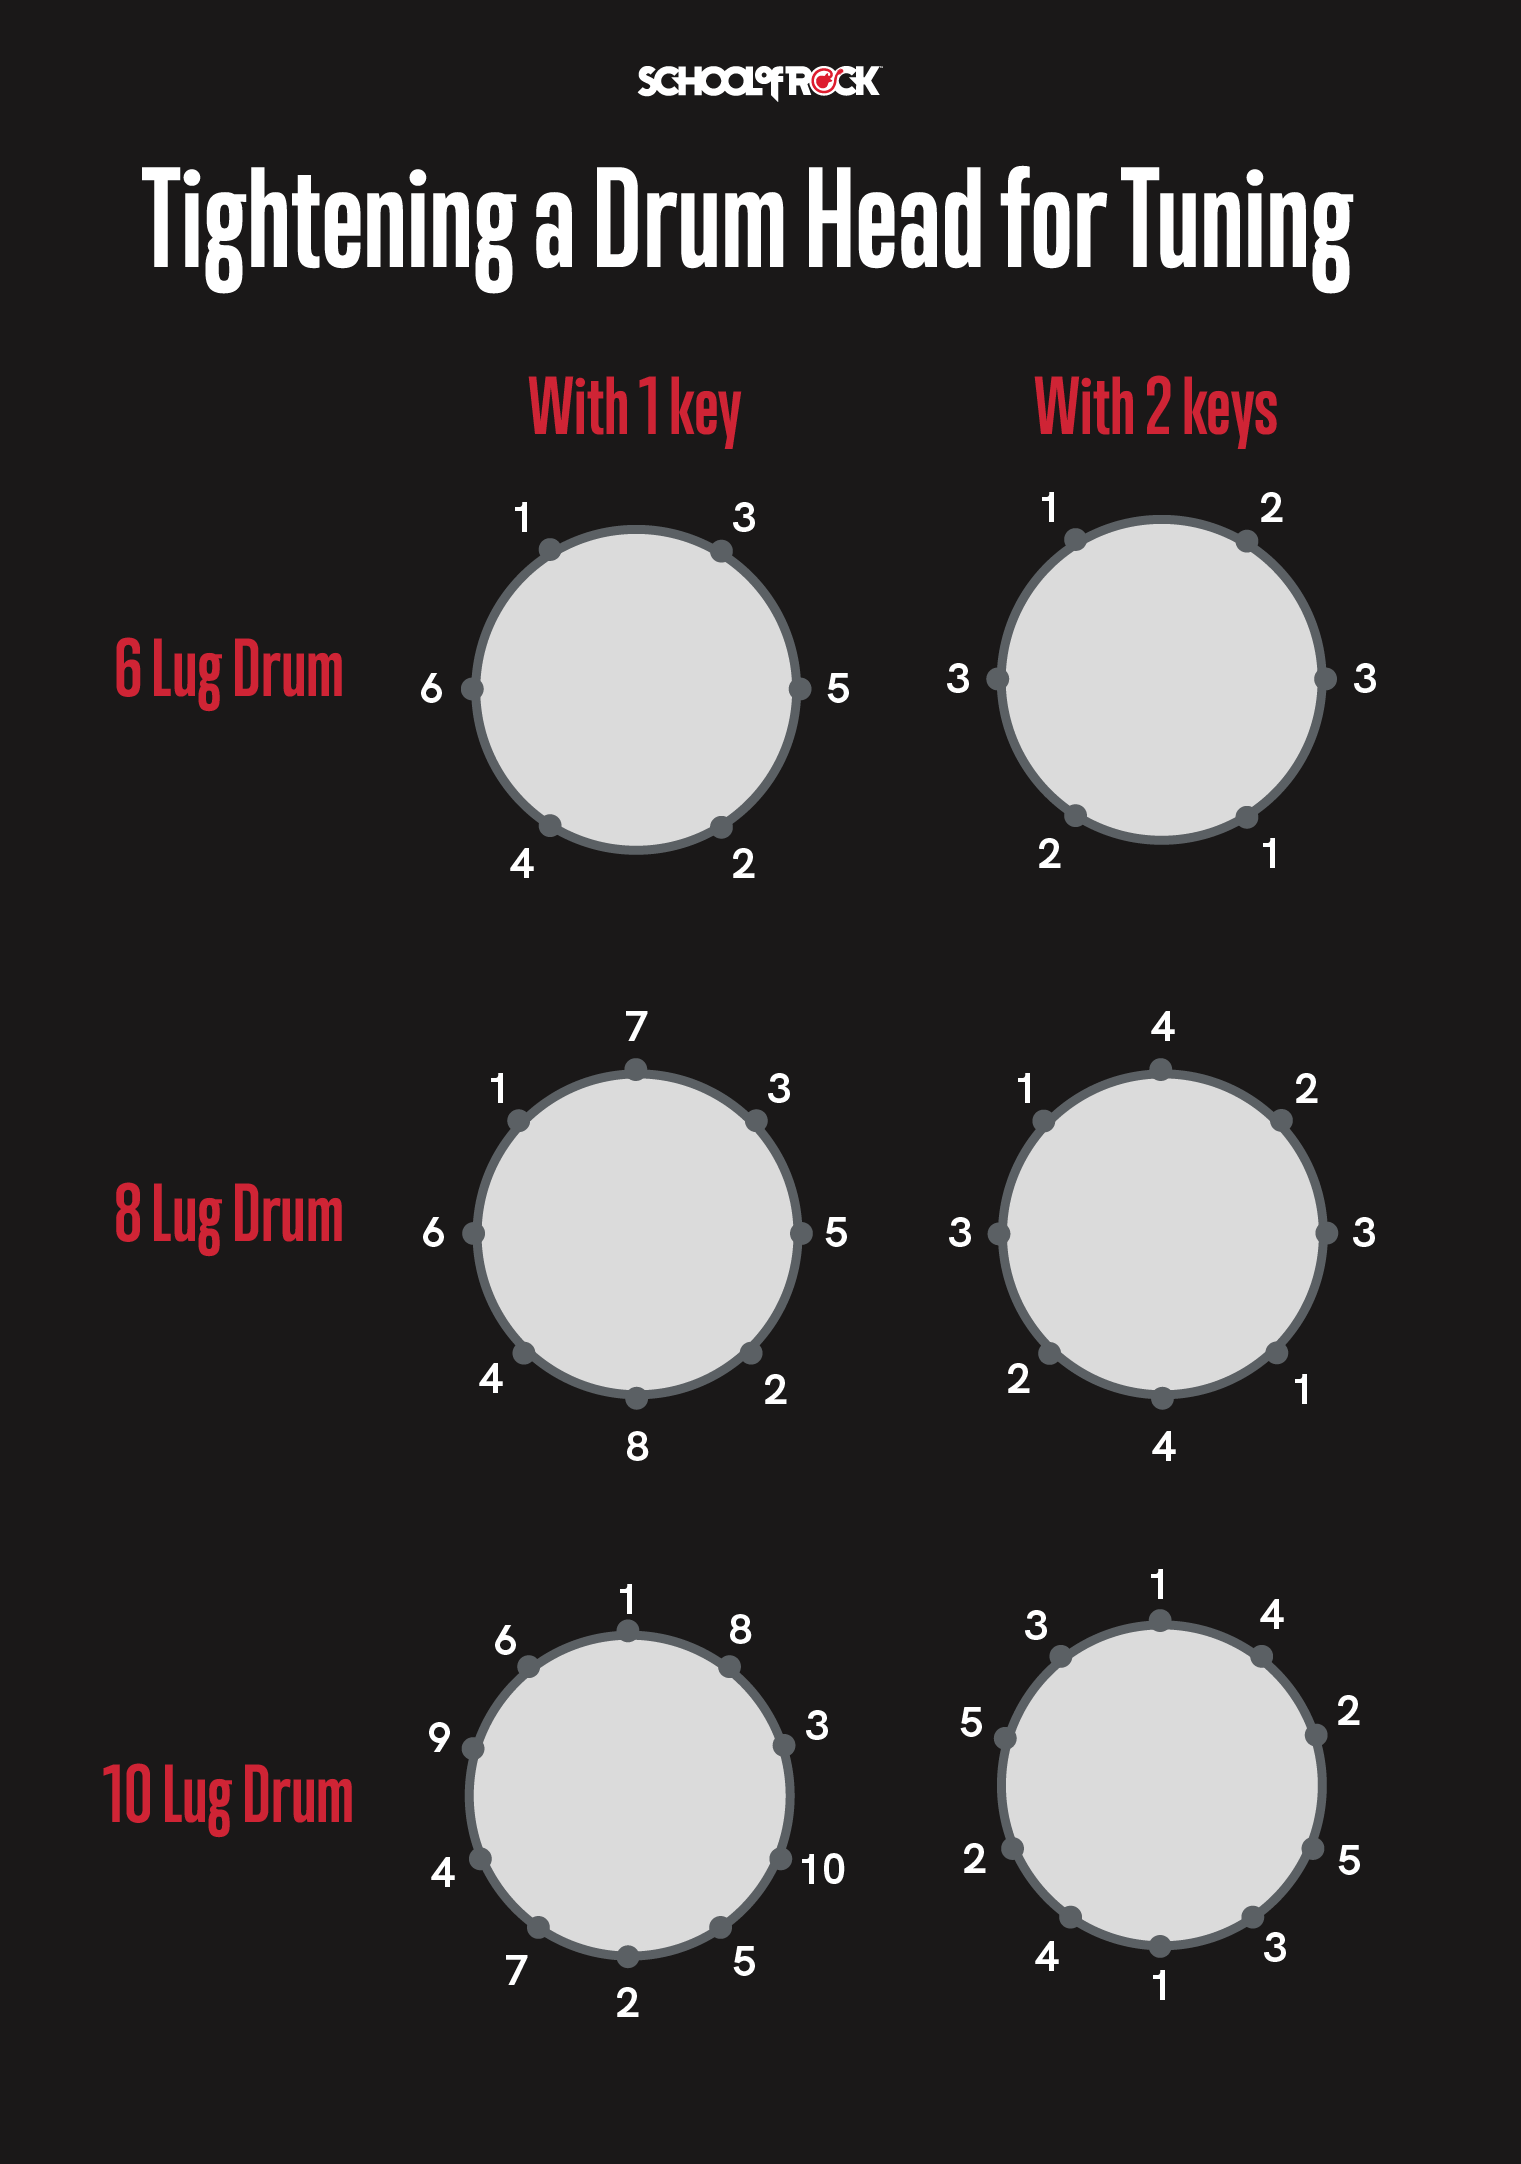
3. Use a drum key to tighten each tension rod in a diagonal pattern
When tuning your drum heads, you’ll use a drum key to tighten the tension rods. Using a diagonal pattern, give each rod a half turn, gradually bringing the drum up to pitch. This keeps the tension on the drum head even. As you’re tuning, tap the drum head lightly with a stick close to the edge of the head, using the rods as a guide. The pitch of each area should be the same if the tension is even.
4. Stretch the head and remove wrinkles as you go along
As you begin tuning your drum, you’ll need to “seat” the head by pressing down on the drum head with both your palms together. Press firmly but not too hard. You’ll hear a cracking sound: That’s just the glue in the head cracking and is totally normal. This stretches the head so that it’ll hold tuning better. Any wrinkles in the drum head should disappear once you start to get your drum head up to proper tension.
5. Tune your bottom (resonant) drum head
As you tune your resonant head, increase the tension until the wrinkles are gone and there’s equal tension across all the tension rods.
Pro tip: Strike the resonant head gently.
Be careful not to strike the resonant head too hard, as they’re very thin and not designed to be hit as hard as the batter head. If the tension isn’t equal, you’ll hear odd, wavering overtones.
6. Repeat the drum tuning process for the top (batter) head
Now move on to the batter head and repeat the process you used for the bottom head. Gradually tune the drum up until it’s roughly at the same pitch as the bottom head.
7. Fine-tune your drum to your desired pitch
You’ll now need to fine-tune the drum. Drums produce a fundamental tone when struck in the center of the head. This is a different tone than you’ll hear as you tap near the tension rods when tuning.
Mute the opposite head as you hit the drum a few times to hear the tone. Adjust the fundamental tone until you’re happy with the sound. Now play the drum without muting either head and see if the tone is clear and even. Each drum has a range that contains the natural frequencies of that drum. Tuning below this range sounds muddy and dull, while tuning your drum above this range will make the sound thin and choked.
Should you tune your bottom head tighter than your top?
There are three ways to tune a drum: resonant (bottom) head higher than the batter (top) head, resonant head lower than the batter head, and both heads tuned to the same pitch.
Tuning the heads the same produces the most even tone, tuning the bottom head tighter than the top gives the notes a slight bend upward, and tuning the bottom head lower than the top gives the pitch a slight bend downward. Experiment with drum tuning ranges and find the sound you like.
What pitch should you tune to?
Although it’s possible to tune drums to specific pitches, most drummers tune in relation to the other drums in the set. Toms are usually tuned a fourth apart (the first two notes of “Here Comes the Bride”).
This is also dependent on the number of toms; drum kits with several toms may need to be tuned to closer intervals to allow all the drums to sound their best and not be tuned beyond their comfortable frequency range.

Get realtime performance feedback
You don't have to practice the drums on your own. With the School of Rock Method app, you can get live feedback as you play to make practice smarter, not harder.
Check out the School of Rock MethodOther drum tuning tips
There’s no single, standard method for how to tune a drum set. A lot of it comes down to personal preference and the style of music that you play. Here are some methods and tips on how to tune a drum set that will help you achieve your perfect drum sound:
Try drum dampening or muffling.
Drum dampening is done by adding something to the batter head to minimize the unwanted “ring” of a drum. There are little pieces of soft plastic called gels that can be stuck to drum heads, or sometimes small strips of gaff tape are used.
Vintage drums often employed mufflers that were inside the drum that, when engaged, pushed a felt disc onto the underside of the head. This gives the drum a softer sound with less attack and sustain.
Maintain your drums to keep them in tune.
Regular drum maintenance is essential to keeping your drums in tune. You can apply lubricant to the tension rods to keep them from stripping out the lugs. Set up your kit to where it’s comfortable to play. Change your heads when needed and try to strike the center of the drum head so that you don’t dent the edges.
Consider using a tuning aid.
There are many tools on the market that can help you tune your drums. These include devices that measure drum tension and torque, allowing you to quickly tune to equal tension across the drum. There are even drum tuners that show pitch just like bass guitar tuners.
Drum tuning chart
As mentioned before, each drum has a range of pitch that it can accommodate. This is sometimes referred to as the resonant pitch of the drum. The resonant pitch is dependent on the size of the drum and the type of wood used. Smaller drums have higher resonant frequencies, and larger drums have lower resonant frequencies.

Tuning your snare drum
The snare drum is the loudest part of the drum set and is known for having a lot of attack but little sustain. The snares are attached to the bottom head and give the drum its signature sound. Snares are made of wood or metal, which affects the tone greatly. Metal snares are usually louder and cut through a band more than a wood snare.
What pitch should the snare drum be tuned to?
While there’s no standard note that the snare drum is typically tuned to, most drummers pitch their snare somewhere between E3 and B3 (the third octave is the octave below what’s called middle C on the piano). A3 is a common pitch for snare drums.
Snare drum tuning tips
Tuning your snare drum is mostly a matter of personal preference. If you find a recording of a snare that you want to emulate, try to match that pitch. If your snare head has a lot of dents and is difficult to tune, swap it out for a fresh head.
Tuning your kick drum
The kick drum (also called the bass drum) provides the bottom end of your kit. It should have a deep sound with a nice attack. Most kick drums are 22 inches in diameter, but smaller kicks are sometimes used for jazz or quieter gigs. Led Zeppelin’s John Bonham often used a 26-inch kick to get his monstrous sound.
What pitch should the kick drum be tuned to?
Kick drums are usually tuned lower than the low E on a bass guitar. Start by tuning the kick drum until the wrinkles disappear in the head. From there, experiment with the pitch until you get a tone that you like. Often, the kick drum is felt as much as it’s heard, so consider the bounce and feel of the drum when deciding how to tune your kick drum.
Kick drum tuning tips
If your kick drum lacks definition, pitching the resonant kick drum head slightly higher than the batter head will tighten up the tone. If you move your drum set frequently, make sure to check the tuning, since it’s easy to inadvertently adjust the tuning as you’re moving the drums.
If you move your drum set frequently, make sure to check the tuning often.
Tuning your toms
Most drum sets have two or three toms, but some drummers, such as the late Neil Peart of Rush, had eight or more toms (including the floor toms). If you have two or three toms, you can tune them to wider intervals. Multiple toms are generally tuned more closely together so that the drums are all in their “normal” pitch range.
What pitch should the tom drum be tuned to?
There can be a lot of variety in how the toms are tuned. Small toms (8-10 inches) are usually tuned somewhere between E3 and B3. Medium toms (12-14 inches) are tuned lower, and large toms (16-18 inches) are tuned even lower. As you play across your drum kit, the pitch goes lower as you move from smaller toms to larger toms.
Does the diameter of the drum affect tune?
The diameter of the drum will determine the pitch. Most drums are four- or five-piece kits with two or three toms. Rock drums (especially heavy metal drums) generally have larger toms than kits designed for jazz.
Tom tuning tips
The tension of the resonant head is particularly important for tuning your toms. If you’re happy with the fundamental pitch of the batter head, fine-tune the resonant head to maximize the resonance of the drum.
Start with the same pitch for both heads and experiment with ranges by tuning the drum’s resonant head up and down. Remember, it’s a matter of personal taste!
Drum tunings for different music styles
Different styles of music may call for different tunings. Here are some tuning basics by genre:
- Drum tuning for rock music. Most rock drummers use larger drums with a relatively low tuning that limits the resonance of the toms. There’s an emphasis on the “crack“ of the snare.
- Drum tuning for metal music. A very tight, focused sound is preferred by heavy metal drummers. Drums are large and tuned low, but the snare is tuned higher to get more volume and cut through the mix. Kick drums are tuned to emphasize the attack of the beater.
- Drum tuning for pop music. This genre calls for a balanced sound that’s open and has more resonance than louder rock. Most pop drummers use medium-size drums tuned to get an even sound.
- Drum tuning for jazz music. Drummers in jazz combos typically tune their drums higher and want to get as much resonance as possible. The drum sizes are typically smaller, which helps with the higher tuning.
Remember to use our drum tuning chart and experiment with different drum heads and tunings until you find your sound.
After choosing the best drum set for you, and tuning your drums, the next most important thing for a beginner is learning how to play! From beginner to advanced, School of Rock has taught thousands of students how to play drums and achieve their full potential. From tuning to rudiments, our drum teachers have the knowledge and experience to have you quickly playing your favorite Rock songs on stage.