
Do you feel like you’ve plateaued as a bass player? Trying to find new ways to improve your playing? As musicians, we’ve all had times along our journeys when we feel the need to start learning new advanced bass guitar techniques to challenge ourselves and become more proficient. In fact, learning how to play multiple instruments can often inspire new approaches to your primary one. Fortunately, there’s more to the bass guitar than just playing simple beginner bass riffs with a pick. In fact, bass is an incredibly diverse instrument that offers a wide array of intricate techniques to master. So, let’s dive into five of these advanced bass guitar techniques that will help to broaden your knowledge of bass guitar and deepen your toolbox so that you can become the most well-rounded bassist that you can be!

TECHNIQUE 1: FINGERSTYLE
WHat is the Fingerstyle Technique?
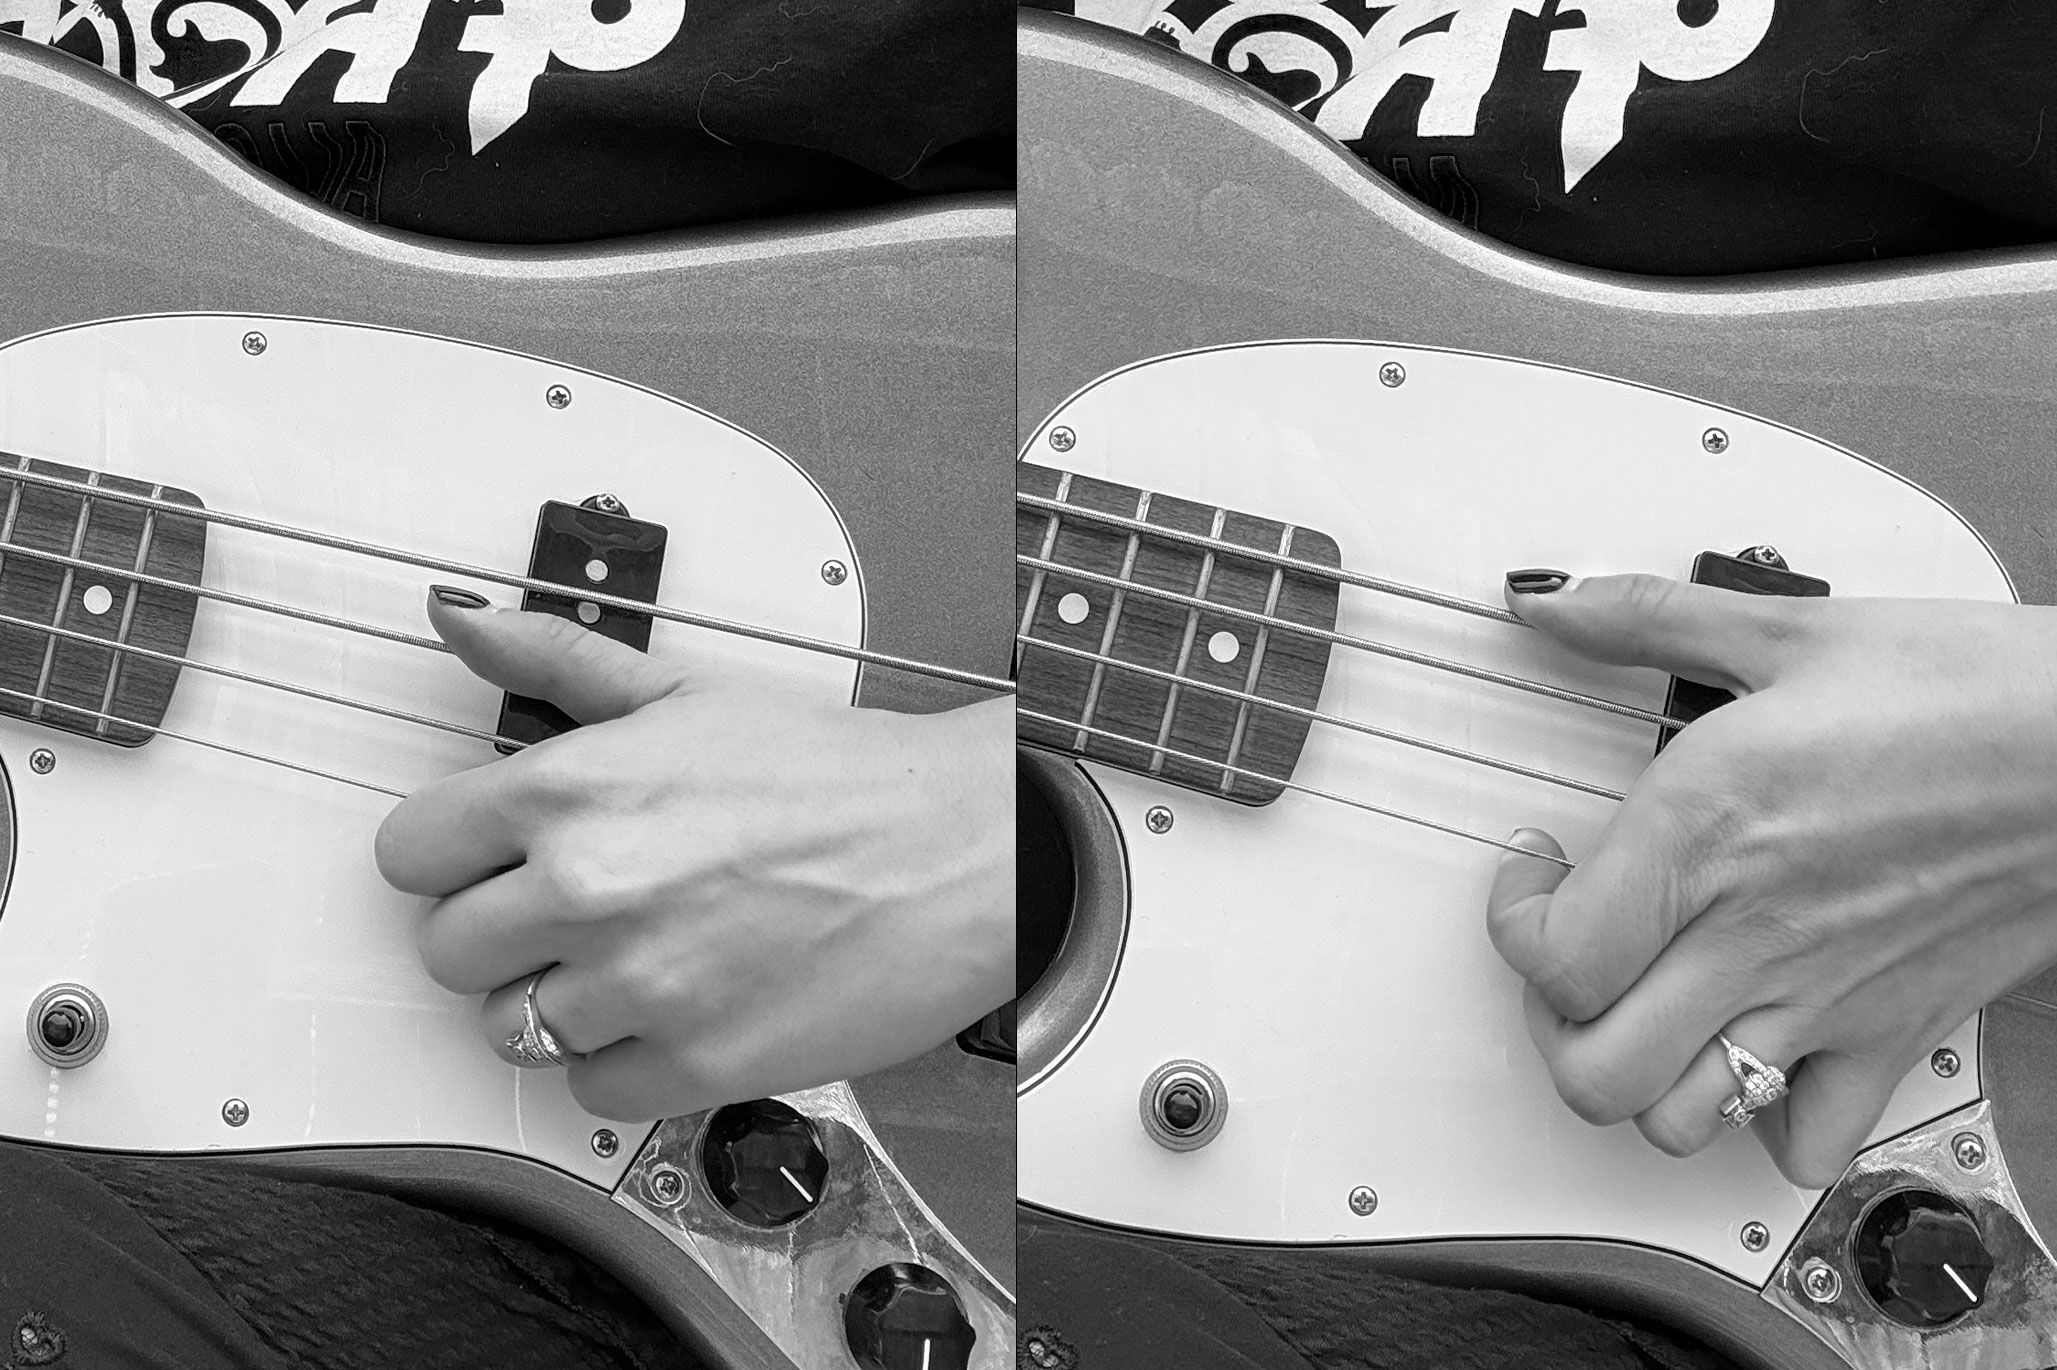
Fingerstyle is the most universal technique in a bassist’s arsenal. As the name implies, the technique utilizes the tips of the fingers of your non-fretting hand to pluck the strings of your bass in an upward motion. Traditionally, fingerstyle bassists use the first and second fingers of their plucking hand in an alternating pattern (i.e. first-second-first-second).
Why You Should Learn the Fingerstyle Technique
There are a variety of reasons why this technique is crucial for any player to learn. Perhaps most importantly, fingerstyle is considered to be the “traditional” method of playing the bass guitar. While there are plenty of skilled and successful bassists who do prefer to play with a pick, fingerstyle is the preferred playing technique for many of the most revered bass players of all time. Renowned bassists such as James Jamerson, Jaco Pastorius, Geddy Lee, and Steve Harris all helped to revolutionize the landscape of modern bass playing while predominantly using their fingers to pluck the strings.
One of the greatest benefits of playing fingerstyle is that it gives a bassist a wide range of tonal options to work with. While plucking with a light-to-medium touch will produce a classic warm, round tone from your instrument, playing with a harder attack can produce a more aggressive sound that’s perfect for heavier styles of music. Expanding even further, your fingerstyle tone can change based on where you’re plucking relative to the body of your instrument. If you pluck closer to the neck, you’ll get a sound that is bassy and warm. Meanwhile, you should play near the bridge if you want a tight sound with more treble in it. This broad palette makes fingerstyle useful for any genre, from the smoothest funk grooves to the blistering speed and power of heavy metal. Ultimately, mastering the Fingerstyle Technique is absolutely essential to becoming a well-rounded bass player capable of tackling more advanced bass guitar techniques.
Fingerstyle Exercises That You Should Practice
To begin learning this technique, simply start by plucking the open strings on your instrument, starting on the E string. Be sure to alternate fingers after each pluck, in a ‘first-second-first-second’ pattern. Practice along with a metronome so that you get acclimated to the idea of plucking at a consistent rhythm.
Once you feel comfortable playing on the open strings, get your fretting hand involved by playing chromatically from the 1st fret to the 4th fret on each string, again starting on the E string. As with the previous exercise, make sure you practice to a metronome and alternate your fingers in the ‘first-second-first-second’ pattern. When doing this exercise, focus on the coordination between your fretting and plucking hands.
TECHNIQUE 2: SLAP AND POP
Tracing its roots back to ‘60s funk music, Slap and Pop has become one of the most popular and important advanced bass guitar techniques for players to learn. The technique is defined by the two parts that make up its name: the slap and the pop. The ‘slap’ refers to the action of using the side of the thumb on your plucking hand to quickly strike the string toward the pickup. Meanwhile, the ‘pop’ refers to using any of your plucking fingers – though traditionally the first or second finger – to hook underneath the string, lifting it up away from the body of the bass, and quickly releasing it back toward the pickup like a slingshot.
Why You Should Learn Slap and Pop
Ever since the first Slap and Pop bass lines were recorded by Sly and the Family Stone’s Larry Graham in the 1960s, the technique has been heavily associated with funk music, and for good reason. Slapping and Popping, when done correctly, produces a punchy attack and a distinctly percussive sound that lends itself perfectly to music like funk and R&B, which are very centered around a tightly syncopated rock and roll rhythm section. However, while the uniquely percussive sound of Slap and Pop lends itself remarkably well to the syncopated grooves of funk, there are many famous bass players who have brought the technique into other genres of music. Perhaps the two most famous examples in the domain of rock music are Flea from Red Hot Chili Peppers, and Primus frontman Les Claypool.
While many notable Slap and Pop bass lines can be performed with your fingers or a pick, the snappy percussive tone that is achieved through slapping cuts through the mix and elevates the rhythm section in a unique way that only the Slap and Pop technique can.
Slap and Pop Exercises That You Can Use
Slap and Pop bassists commonly use the technique to play octaves; the thumb strikes the lower octave, and the plucking finger pops on the higher octave. So, a perfect exercise to start getting your Slap and Pop technique up to speed is to play octaves between the E strings and D strings. Start by slapping the 1st fret on the E string and popping the 3rd fret on the D string, playing in quarter notes and moving up chromatically to the next fret after completing each octave. Do that up to the 12th fret before moving chromatically back down. Be sure to start slowly when you first start practicing this exercise and concentrate on getting the right tone from your instrument with each strike. This precision is crucial for all advanced bass guitar techniques.
Once you feel comfortable slapping and popping on the E and D strings, try practicing this same exercise by playing on the A and G strings, starting on the 1st fret of the A string and moving chromatically all the way up to the 12th fret before going back down toward the headstock.
After you’ve become acclimated to slapping and popping between all four strings, try this same chromatic exercise one final time alternating between slapping and popping on the E and D strings and the A and G strings. Start on the 1st fret of E and slap and pop both octaves, then do the same between the A and G strings before moving down to the 2nd fret of the E string, and so on. This will help to get you comfortable with switching between strings, which is very common in most slap bass lines.
TECHNIQUE 3: TAPPING
While the technique of tapping is strongly associated with the electric guitar – popularized in the rock world by visionary guitarist Eddie Van Halen – tapping can be just as effective and exciting when played on a bass. It is one of the most impressive advanced bass guitar techniques. Tapping separates itself from most other techniques on the bass in one crucial way: the tapping technique utilizes the fingers on your plucking hand to press down the strings on the fretboard and produce individual notes. While most other techniques have you plucking the string with one hand while fretting with the other, the act of tapping requires that you use the fingers of your plucking hand to literally tap the string into the desired fret in order to produce the note.
Why You Should Learn to Tap on Your Bass
Simply put, the tapping technique greatly expands the range that you’re capable of playing in a single sequence. In the same way that a pianist can use both of their hands to access both the highest and lowest notes on the piano in quick succession, the tapping technique extends the accessible range on your bass. The two-handed freedom of tapping also allows you to play quick phrases that would otherwise be nearly impossible to perform with only your fretting hand moving around on the fretboard. Brilliant bassists such as John Myung from Dream Theater and Billy Sheehan from Mr. Big have incorporated tapping into their playing throughout their careers to infuse blistering fast speed as well as extreme technicality into their bass parts.
Tapping Exercises You Should Practice
Before you begin learning to tap on your instrument, it’s important to establish proper form. Start by resting the thumb of your plucking hand on the upper edge of the neck of your bass. This will help to stabilize your hand so that your fingers can strike into the strings more precisely. When you’re tapping, make sure that you use the very tip of your finger to strike the string into the fret. Tapping with your fingertips will give you a stronger and more precise attack and will make it easier to produce the note that you are playing.
A great place to start strengthening your tapping skills is by working through major scales, tapping every third note of the scale with your plucking hand. For example, start with the C Major scale starting on the 3rd fret of the A string. With your fretting hand, tap the 3rd and 5th frets. Then, with the first finger of your plucking hand, tap the 7th fret of the A string. Move that same exact pattern up to the D string. Finally, complete the scale by tapping the 4th fret of the G string with your fretting hand and the 5th fret with the first finger of your plucking hand.
The tapping technique is often used to quickly play triads or arpeggios. So, another great way to practice your tapping is to work on single-string arpeggios. For this exercise, we’ll start with an E minor triad on the G string. Place the first finger on your fretting hand onto the 9th fret of the G string, and your fourth finger onto the 12th fret. Then, with your plucking hand, tap the 16th fret of the G string. Pull off of the 16th fret to the 12th fret, pull off with your fourth finger to the 9th fret, and then finally hammer-on back onto the 12th fret. Repeat this motion with a metronome until you feel that you can play each note at a consistent rhythm.
TECHNIQUE 4: HARMONICS
What Are Harmonics?
Every musical note that you can fret on the bass guitar isn’t simply a single frequency but is actually made up of a complex bundle of overtones known as the harmonic series, which is where this technique gets its name. Essentially, every note on the bass produces a series of higher pitches that help to make each note sound fuller to our ears. Developing the ability to hear these subtleties is a great reason to use ear training exercises. On the bass guitar, we are able to access and isolate many of those higher pitches by playing what we know as harmonics. For the purposes of this discussion, we will specifically be learning about natural harmonics. Natural harmonics are overtones that are produced above the notes of our open strings.
Why You Should Learn to Play Harmonics
Incorporating harmonics into your bass playing will allow you to expand the playable range of your instrument while also broadening the overall textural palette that you have at your disposal. It is one of the most interesting advanced bass guitar techniques.
Harmonics have a delicate, bell-like sound that is entirely unique to any other technique on the bass. For a great example of the chiming sound of harmonics, listen to Tony Kanal’s bass part in the intro to the No Doubt song ‘Just A Girl’.
Harmonics also allow you to access higher pitches from the first nine frets of the fretboard that you would normally only be able to access past the 12th fret and can also extend the range of your instrument beyond the length of the fretboard. For example, the harmonic on the 4th fret of the G string produces a high B which is two octaves above the open G string, and a whole major 3rd above the 24th fret which is commonly the upper limit of a bass neck.
Harmonic Exercises That You Should Practice
Before we look at specific exercises to practice, let’s go over proper form to produce a harmonic on your bass. This requires a solid understanding of your instrument, beginning with our guide to tuning a bass guitar, as harmonics are directly related to the open string notes. To start, locate the 12th fret of your E string. Gently touch one of your fretting fingers directly over the wire of the 12th fret. Be careful not to apply any downward pressure onto the string as you would when fretting the string normally. Then, pluck the E string with your plucking hand as you would with any other note. You should hear the harmonic of a high E come from your bass at this point, and the note should continue ringing out if you move your fretting hand away from the fretboard. If you followed those steps and heard a note at the end, then you just played a harmonic! If you didn’t hear a note after you plucked the string, make sure that your finger is directly above the fret and that you’re lightly touching the string with exclusively one finger.
Now that we understand the mechanics of how to produce a harmonic, let’s look at some exercises to start practicing. First, it’s important to understand that the natural harmonics on the open strings work in the opposite direction of the fretboard compared to regular fretted notes. While the pitches of fretted notes get higher as you move further away from the headstock, natural harmonics get lower in pitch as you get higher up the neck. The most commonly used natural harmonics on the open strings are frets 12, 7, 5, and 4 on whichever string you use. So, we’ll start this exercise by playing harmonics on the 12th, 7th, 5th, and 4th of the E string. Play them slow and steady, and make sure that you’re producing that clear chime of the harmonic for each one that you pluck. Now, do the same exact thing on the A, D, and G strings until you can consistently produce each harmonic.
TECHNIQUE 5: SWEEP PICKING
What Is Sweep Picking?
Just like tapping, sweep picking is a technique that started out on the guitar. Although it traces its roots back to jazz guitarists of the 1950s, sweep picking has become a staple of advanced bass guitar techniques in more technical metal and progressive rock genres in the modern era. Sweep picking typically involves playing arpeggiated patterns broken up into one or two notes per string, while the plucking hand – typically using either your thumb or a pick – sweeps up and down between strings in perfect synchronicity with the arpeggiated motions of your fretting hand. These sweep picks are generally performed as high-speed passages in most songs, so sweep picking requires that both of your hands work perfectly in unison to accurately produce every note.
Why You Should Learn How to Sweep Pick
While sweep picking may be seen as being more niche compared to many of the other advanced bass guitar techniques on this list, the benefits are still clear. Sweep picking gives you an incredible speed in playing arpeggiated passages that would be extremely challenging to pull off otherwise. Although it is possible to play such quick arpeggios without the use of sweep picking, this technique will help you play them much more cleanly and efficiently due to the smooth plucking motion.
Sweep Picking Exercises That You Should Practice
Since sweep picking typically involves playing arpeggios with your fretting hand, practicing this technique using major and minor arpeggios is a great starting place. So, let’s use an E minor arpeggio starting on the 12th fret of the E string. Place your first finger on the 12th fret, strum the E string with either your thumb or pick, and then hammer-on to the 15th fret of the E string with your fourth finger. Next, bar the 14th fret of the A and D strings using your third finger, and pluck both strings in consecutive downstrokes. Finally, place your first finger onto the 12th fret, pluck another downstroke, and then hammer-on to the 16th fret with your fourth finger. After you complete the ascending arpeggio, do the reverse by starting on the 16th fret of the G string, pulling off to the 12th fret, going to the 14th fret of the D string and then the A, then reaching the 15th fret of the E string before completing it by pulling off to the 12th fret of the E string.
To practice this same exercise as a major arpeggio, simply raise the 3rd up in both octaves up by a half step. For a diminished arpeggio, bring the 5th down a half step.
While you might want to practice this exercise at a quick tempo when you first start out, it’s important to work on this exercise slowly at the beginning. Your focus should be on coordinating the motion between both hands until you can seamlessly play the full ascending and descending arpeggio. Also, be sure to strum the ascending arpeggio only in downstrokes and use only upstrokes when playing the descending arpeggio. This sweeping pattern is where sweep picking gets its name from, after all!
Incorporating Advanced Bass Guitar Techniques into Your Playing
As you search for more advanced bass guitar techniques to incorporate into your playing, remember that the bass is ultimately a bass guitar. As such, many of the techniques associated with the guitar can just as effectively be translated onto the bass. We’ve already established that tapping and sweep picking made their way onto the four-string after being discovered on the guitar, but the list certainly doesn’t end there. For example, chords are not played on bass nearly as frequently as on the guitar but can sound lush and full when played in the upper registers of the instrument. Classical guitar plucking, which involves the combined use of your thumb and fingers to pluck individual strings, can also be an incredibly useful way to play arpeggiated passages or lines with multiple voices. You can find even more information in our collection of bass guitar resources. Effects pedals are also generally associated with guitar, but plenty of innovative bassists such as Cliff Burton from Metallica and Justin Chancellor from Tool have used pedals to create new sonic landscapes. Many of the principles behind guitar pedal settings can be applied to bass to unlock new tones. In short, there are countless techniques that can make you the best and most diverse bassist that you can be. So, if you want to discover these new techniques for yourself, consider enrolling in School of Rock bass guitar lessons today!
ABOUT THE AUTHOR
Timothy Przybylinski is a School of Rock House Band and AllStars alum and longtime teacher. Currently, Tim teaches bass guitar and serves as the Show Director and Assistant Music Director at School of Rock Port Jefferson.