Reading Guitar Tabs for Beginners
Guitar tablature, usually referred to as “tab”, is a method of notating music that empowers beginner guitarists to learn songs quickly and easily. For those just starting, learning guitar tabs is one of the quickest ways to start playing music, and you can even find plenty of easy electric guitar tabs to get going. Guitar tabs share similarities with music staff notation by showing you what guitar notes to play, how long to play them, and what techniques to use. But when compared to standard music notation, learning and reading guitar tablature offers a serious advantage: it shows you where to play the notes on your guitar.
This comes in handy, especially since there are many different places to play the same notes on guitar. For this reason, understanding guitar tablature and learning how to read tabs for guitar is particularly useful for beginners and allows students to learn how to play the guitar without ever having to learn how to read traditional musical notation.
At School of Rock, we teach students how to read guitar tablature since it can show you both chords and single notes –– making it the fastest way to learn your favorite songs. It can also be an easier way to learn, since knowing how to read guitar tabs doesn’t require any special knowledge other than locating the strings and the frets on your guitar.
If you are a beginner guitarist, you might also want to explore what the best beginner guitar is for you to start learning.
If you’re ready to learn about what guitar tabs are and what they can be used for, you’ve come to the right place. Let’s get started.
WHAT ARE GUITAR TABS?
Guitar tablature is the visual representation of the guitar notes in a song. The standard guitar tab consists of six horizontal lines, with each line standing for the six strings on the guitar. When learning how to read tabs for guitar, you’ll need to look at the tablature from top to bottom. The top line represents the high E string (the thinnest string) followed by lines that represent the B, G, D, A, and low E strings (the thickest string).
This also reflects the view of the strings as you look down while holding your guitar. For this reason, think of guitar tablature as your roadmap, for it will provide you with the fastest route to learning guitar songs.
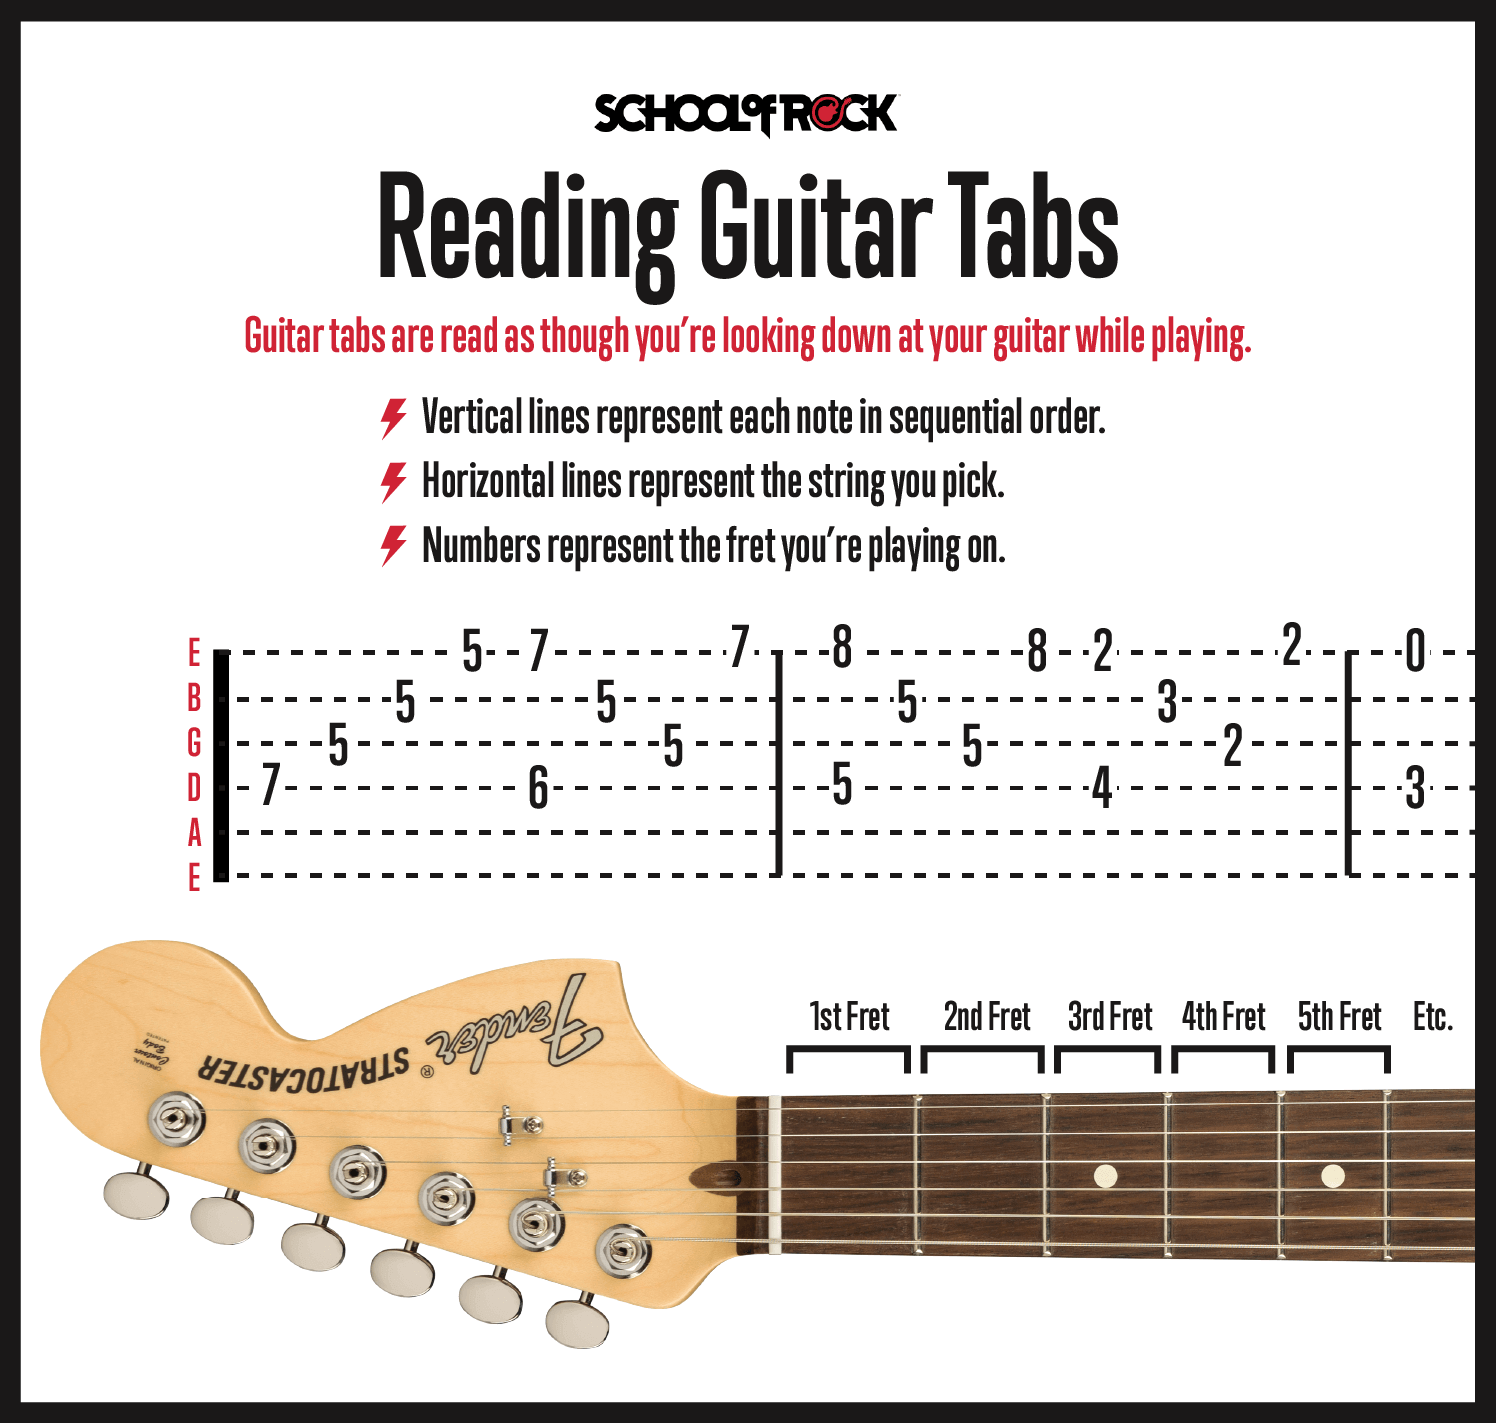
When reading guitar tablature, you will also see numbers on each line of the tab. These numbers stand for the frets on your guitar, which are the metal strips found on the fretboard. The frets are numbered 0-24, start at the nut (the piece closest to the headstock), and run the entire length of the guitar neck.
For example, if the string has a 0, that means you play that string “open,” or without using your fretting hand. If the string has a 1, then that means you must play using the first fret. When learning how to read guitar tabs, it’s important to understand that 1 represents the first fret, 2 the second fret, 3 the third fret, and so on.
If you're thinking of getting your first instrument, check out our guide on how to buy your first guitar.


HOW TO READ GUITAR TABS
Guitar tablature is read left to right, and all notes shown are in chronological order. When the numbers are in line with each other vertically, they represent a chord. A chord is played by strumming all the indicated strings at the same time. Guitar tab notation is better for beginners than standard notation, for it tells you what notes to play to make the chord and where you can find them on your guitar. To learn more about chords, check out our guide to guitar chords for beginners.
WHAT DO I NEED TO KNOW TO READ GUITAR TABS?
When beginners learn how to read guitar tabs successfully, they must familiarize themselves with the six strings and the locations of the various frets. This will allow them to find the proper guitar notes to play while using the guitar tab as a guide.
UNDERSTANDING THE GUITAR TAB STAFF
The guitar tab staff looks like the staff used in standard notation. One major difference is that the staff lines in the guitar tab represent the six strings, not the actual guitar notes.
The top line is the high E string and the bottom line represents the low E string. This makes playing and learning how to read guitar tabs easy for beginners, and the staff will also be labeled “TAB” so it’s not confused with standard notation.
UNDERSTANDING GUITAR FRETS
The guitar frets are the metal strips that run across the fretboard.
Most guitars will have 19-24 frets. Each fret is one note or a half step from the other (which can also be referred to as a semitone). There are 12 notes (or frets) in each octave, and most guitars have fret markers on the side of the neck or the fretboard. These markers are typically at the 3rd, 5th, 7th, 9th, and 12 frets, and can help you easily recognize the fret positions when playing.
Remember: when looking at guitar strings, fretted strings are shown by numbers, and open strings are indicated by the number “0”. This shows you how to play the string “open” without using your fretting hand. You simply pick or pluck the string and let it sound.
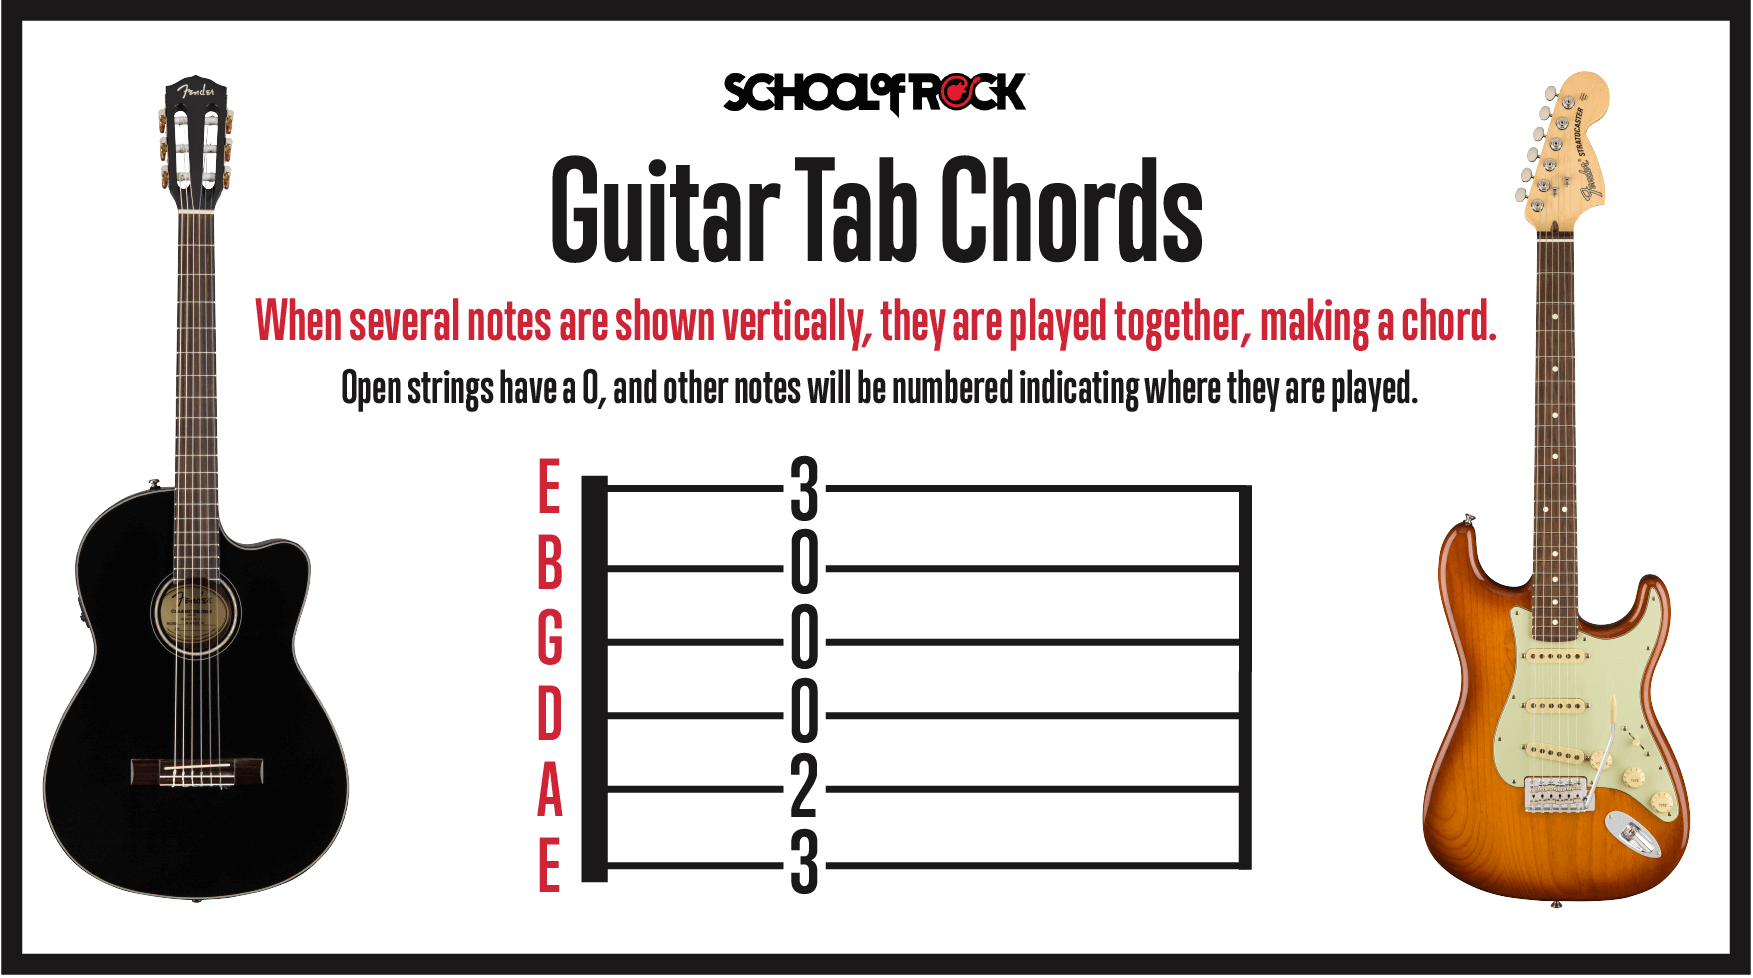
UNDERSTANDING GUITAR TAB CHORDS
While guitar chords do not have any special tablature symbols in the guitar tab, they can be found easily by their position. When several guitar notes are shown to line up vertically, they are played together making a chord. If a chord is arpeggiated, it will appear as single notes even though you are fretting a chord.
UNDERSTANDING GUITAR TAB RIFFS
Many Rock songs consist of “riffs”. Riffs are usually a combination of single guitar notes and partial chords (such as power chords). For riffs, the general rules of the guitar tab apply: when two or more notes on the guitar line up vertically, play them at the same time. This helpful tip makes learning how to read guitar tablature quick and easy.
UNDERSTANDING GUITAR TABS VS CHORD CHARTS
A guitar tab differs from a standard chord chart in a few ways. A chord chart is a diagram showing where to fret each string to make a chord, and it also tells you which finger to use. A chord chart can be included in the guitar tab and is usually positioned over the lyrics of the song to show when the chords are changed.
Chord charts only show the 3 to 4 unique notes that make up the specific chord. However, a correct version of the song may require single notes, notes not in the root chord, or arpeggios (the pattern used to play the individual notes within a chord) that are not indicated. For this reason, chord charts are often featured along with guitar tabs to help beginning guitarists understand how to move beyond the basic chords to play a song.
UNDERSTANDING FINGERS AND NUMBERS
Guitar tablature is linear, but chord charts are like a snapshot of your fretboard. As such, chord charts use a numbering system that shows which fingers to use when playing. The fingers of the “fretting” hand (the hand that pushes the strings down on the fretboard) are numbered. For example, the index finger is 1, the middle finger is 2, the ring finger is 3, and the pinky is 4.
This differs from the tab, as the numbers used in the guitar tab will show which fret to play, and not which finger to use. For this reason, chord charts can be included in easy guitar tabs to show beginners how to position their hands while playing.
PLAY GUITAR IN REAL PERFORMANCES ONSTAGE
Our music programs are taught by practicing musicians with the experience you need to learn to play. Perform live shows and develop your skills in a supportive learning environment for all skill levels.
Learn to playHOW TO READ GUITAR TAB SYMBOLS
Besides lines and numbers, the guitar tab can have different tablature symbols that indicate when to play a specific technique. Learning how to read guitar tabs and tablature symbols and how to apply them will make your playing sound much more authentic and make reading guitar tabs easy.
Before playing, always make sure to check your guitar tuning and adjust your pitch, or your guitar won't sound right.
MUTING GUITAR NOTES
Muting is an important technique in Rock music. Many styles of music, including Heavy Metal, Punk, and Alternative rely on different muting techniques to give the music a certain sound or character.
HOW TO MUTE GUITAR NOTES
While done predominantly with your picking hand, muting can be done with either hand or with both. Muting notes on the guitar adds a dynamic to your playing and is a valuable tool for making you sound more polished. In many songs, the verses may be muted while the chorus or hook is not.
When playing, most guitarists employ muting techniques all the time without even thinking about it. When playing at stage volume, muting keeps you from having unwanted noise or even feedback as you play.
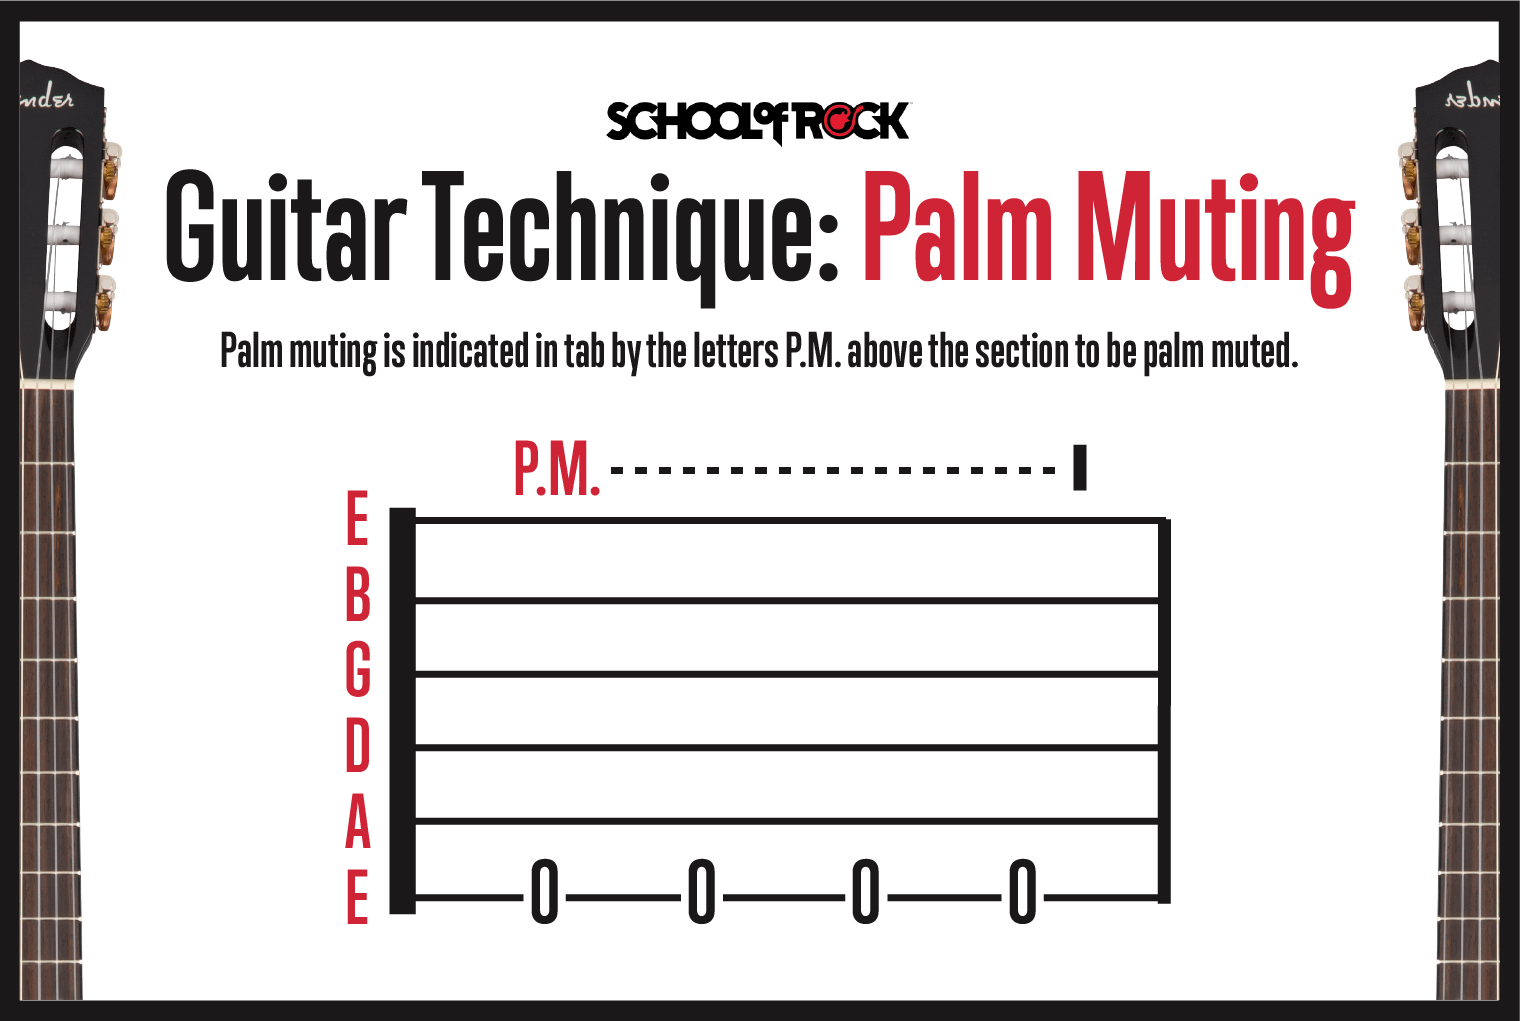
GUITAR TECHNIQUE: PALM MUTING
Palm muting is one of the most used techniques in Rock guitar. It is done by having the palm of your picking hand in contact with the strings as you pick them. Heavy palm muting produces a tight rhythmic sound, while light palm muting lets the guitar notes ring out a little more. Beginners reading guitar music should look for the letters “P.M.” above the section that needs to be palm muted.
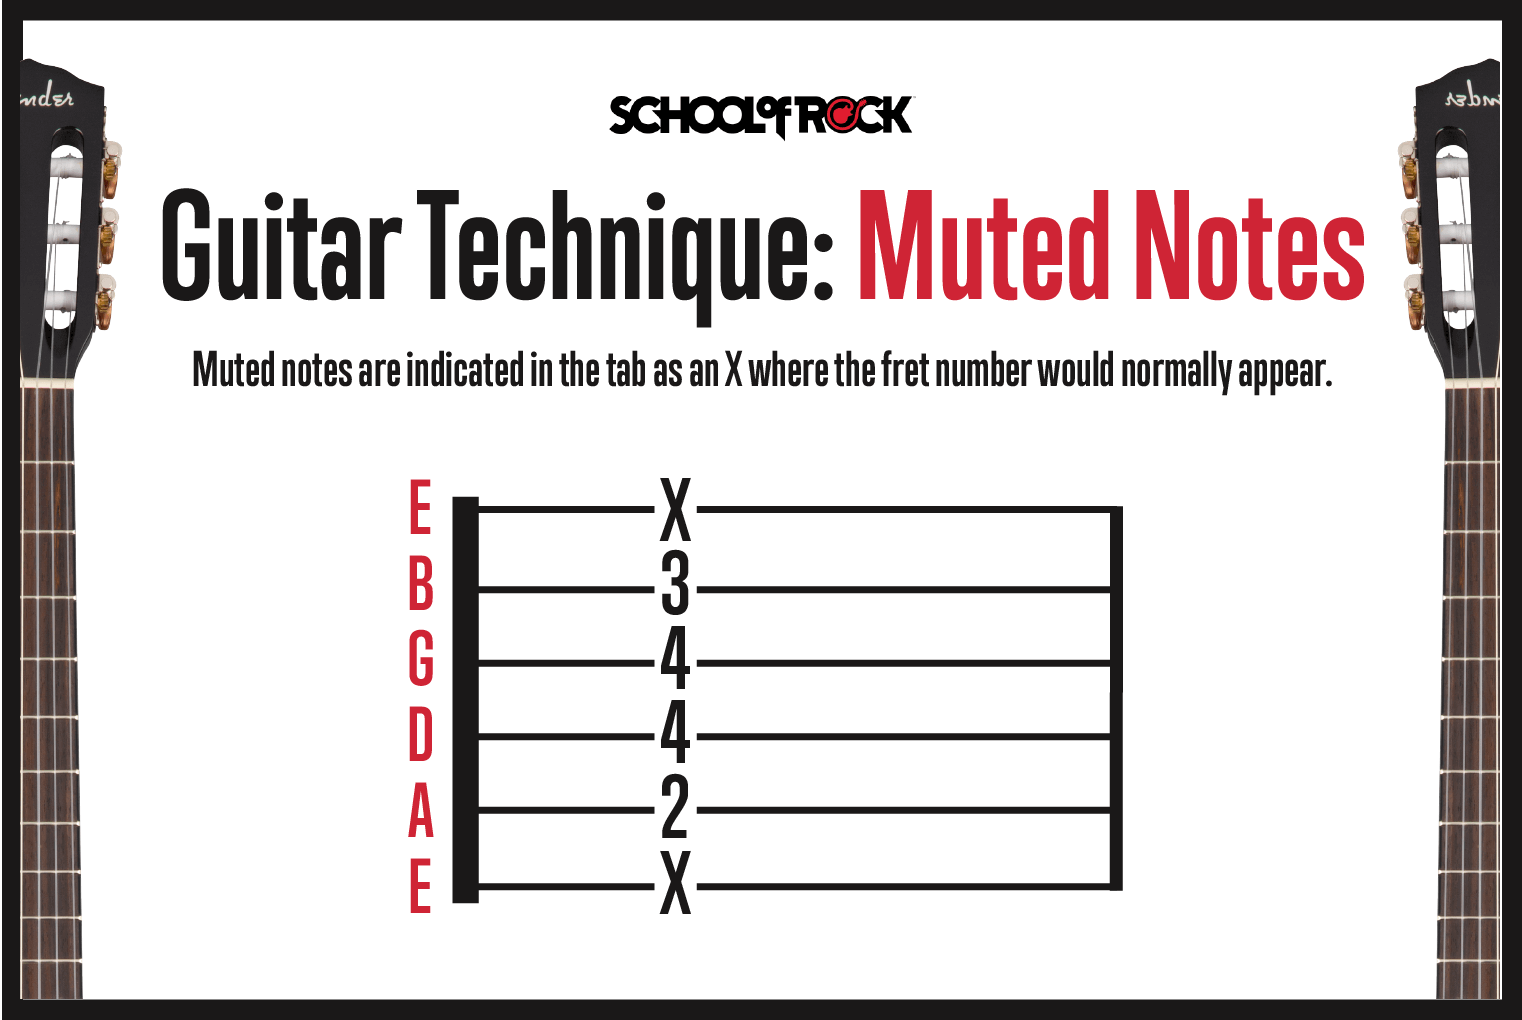
GUITAR TECHNIQUE: MUTED NOTES
Muting notes is a different technique than palm muting, and it is done by using your fretting hand. In the guitar tab, the notes on the guitar are still picked, but they are not clearly sounded as the fretting hand does not press the note all the way down on the fretboard. In guitar tablature, this is shown as an X where the fret number would normally appear.
BENDING GUITAR STRINGS
Bending strings gives your guitar playing an expressive, vocal quality. To find bending in the guitar tab, beginners should look for a curved arrow over the notes on the guitar they want to play. This will make the pitch of the string go higher. The arrow may show a ½ or full step; this is telling you to make the string a ½ step (one note) or full step (two notes) higher in pitch. These guitar notes are often referred to as “target” notes.
HOW TO BEND GUITAR STRINGS
Bending is done by pushing the strings up or down rather than just pressing straight down on the fretboard. For all the strings but the low E, most players push the strings up towards the ceiling, the low E must be pushed down toward the floor. The trick is to keep even, constant pressure on the string as you bend it.
GUITAR TECHNIQUE: BENDING GUITAR STRINGS
Most bends are done using two or three fingers: the “main” fretting finger (usually the ring finger), and the middle and index fingers for adding support and strength. This will make bending smoother and easier and adds control to the pitch of the guitar notes.
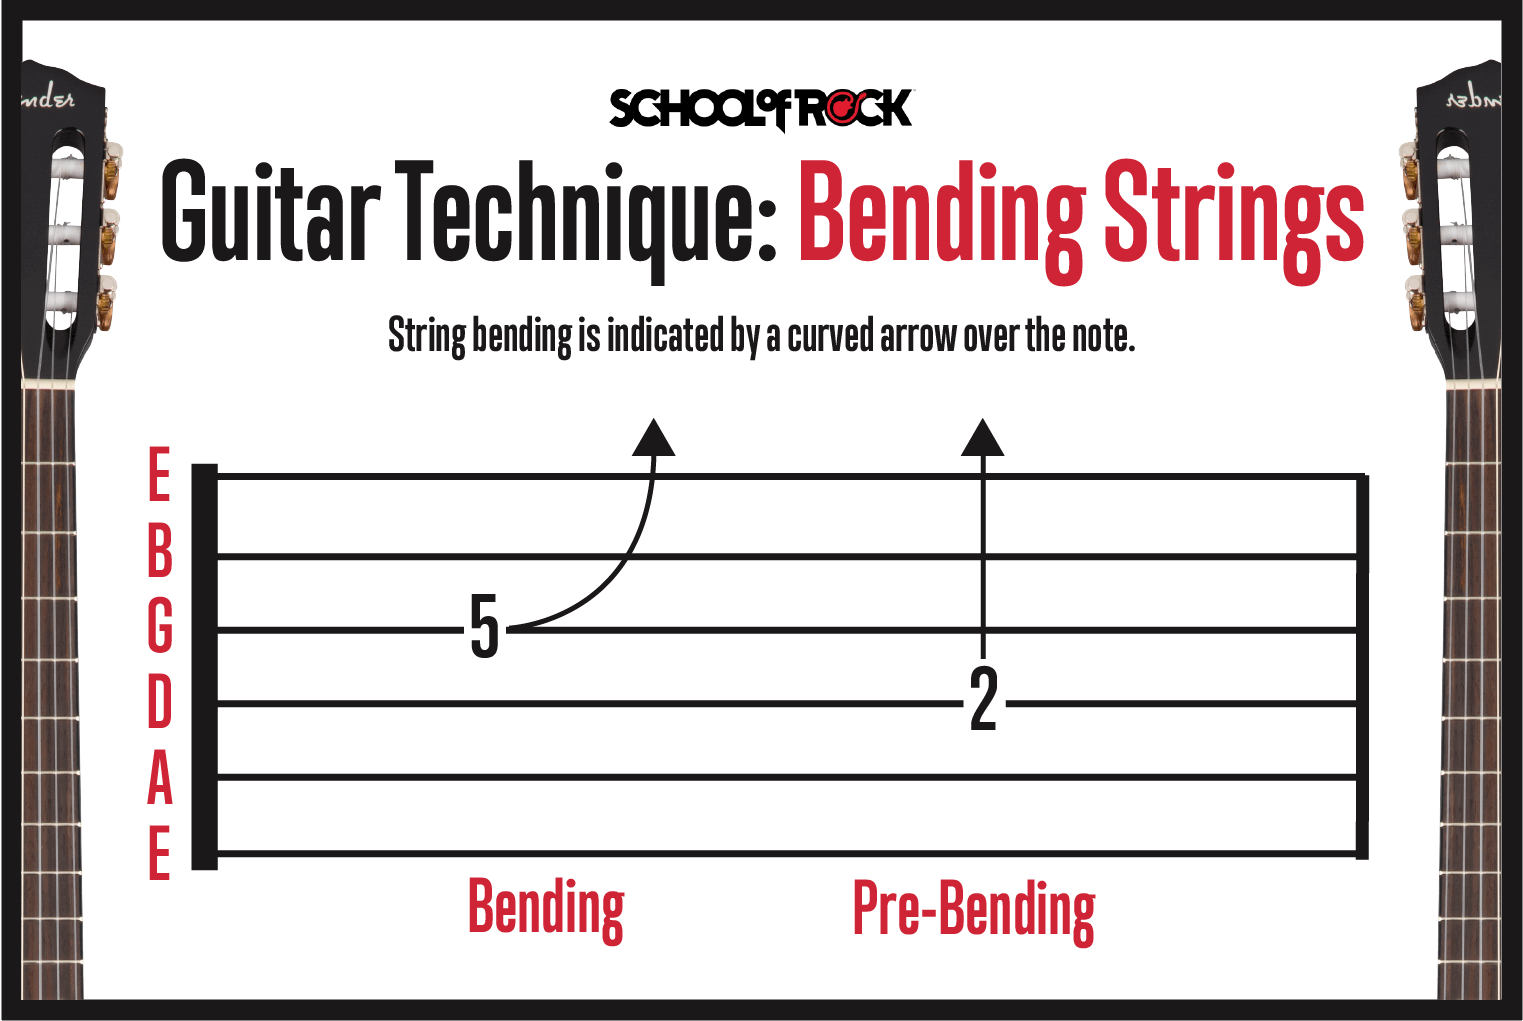
GUITAR TECHNIQUE: PRE-BENDING GUITAR STRINGS
When learning how to read tabs on a guitar, beginners might also meet what’s called a “pre-bend.” In a pre-bend, strings can be “pre-bent” and then picked and released to return to the original pitch of the fretted note. This will be shown by an arrow going straight up with the range of the bend (full, ½, etc.) followed by a curved arrow going down. Pre-bent guitar notes may return down to the original note or bend even higher up to another target note.
SLIDING GUITAR NOTES
Sliding is another useful technique; you can slide up or down to the next note. This is different from bending since you will slide your fretting finger up or down to the desired fret.
GUITAR TECHNIQUE: SLIDE UP
When sliding up, it will be shown by a line between the note you are sliding from to the notes on the guitar you are sliding to. If the note you are sliding to is higher, the line will go slightly up.
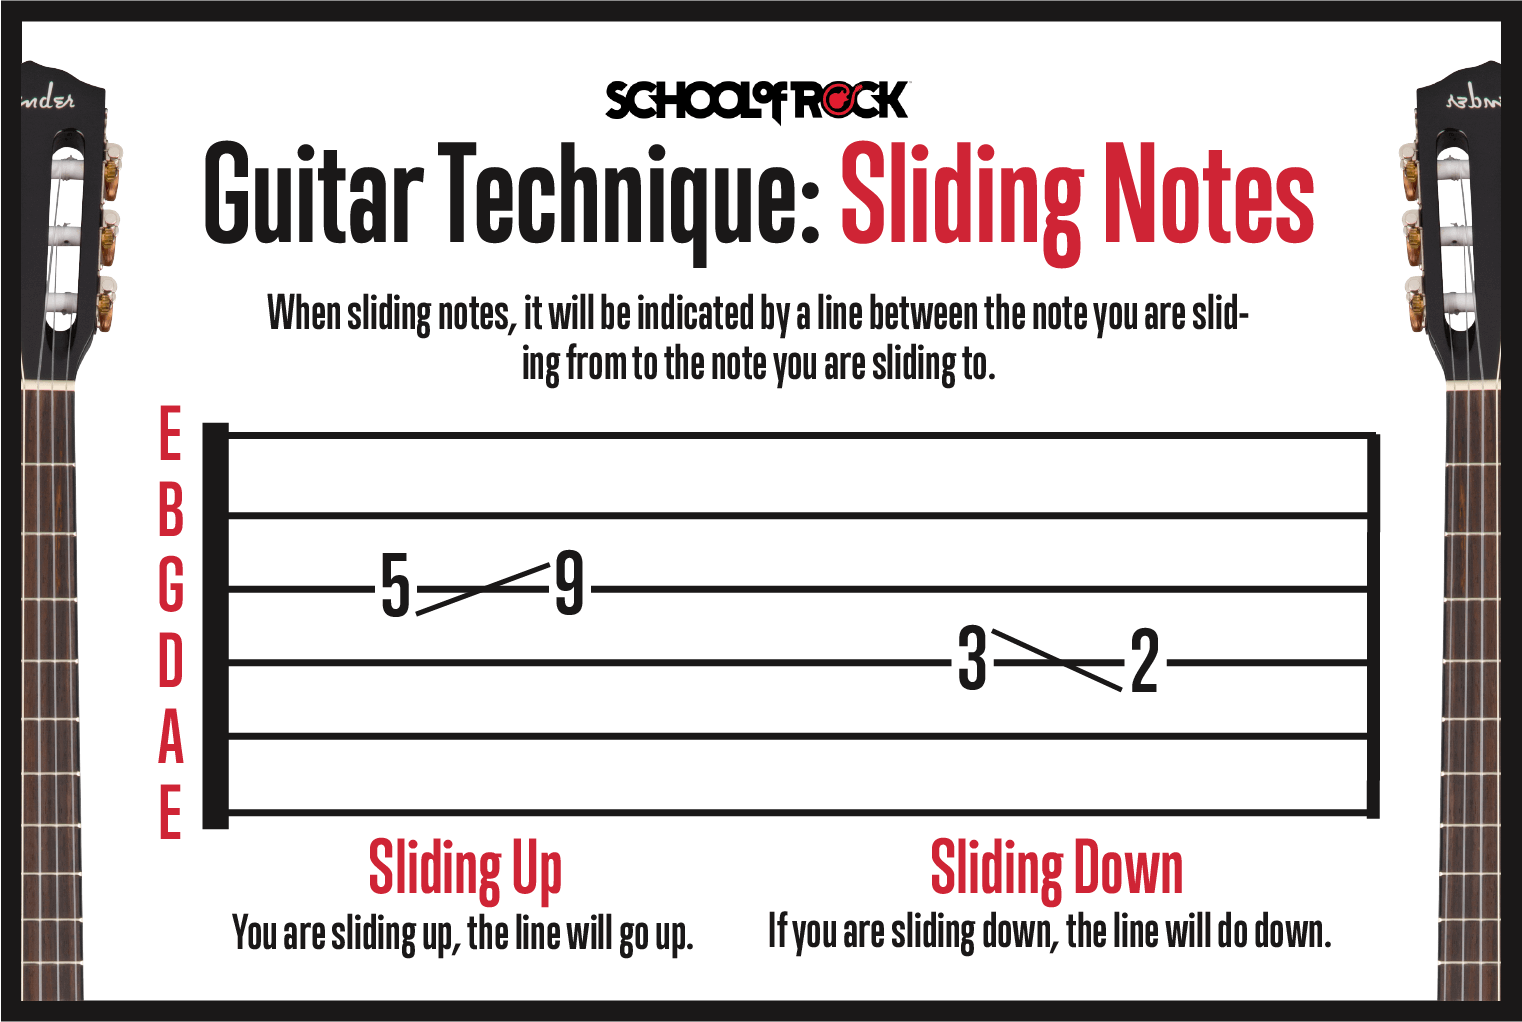
GUITAR TECHNIQUE: SLIDE DOWN
Conversely, when sliding down, it will be shown by a line between the note you are sliding from to the notes on the guitar you are sliding to. If the note you are sliding to is lower, the line will go slightly down.
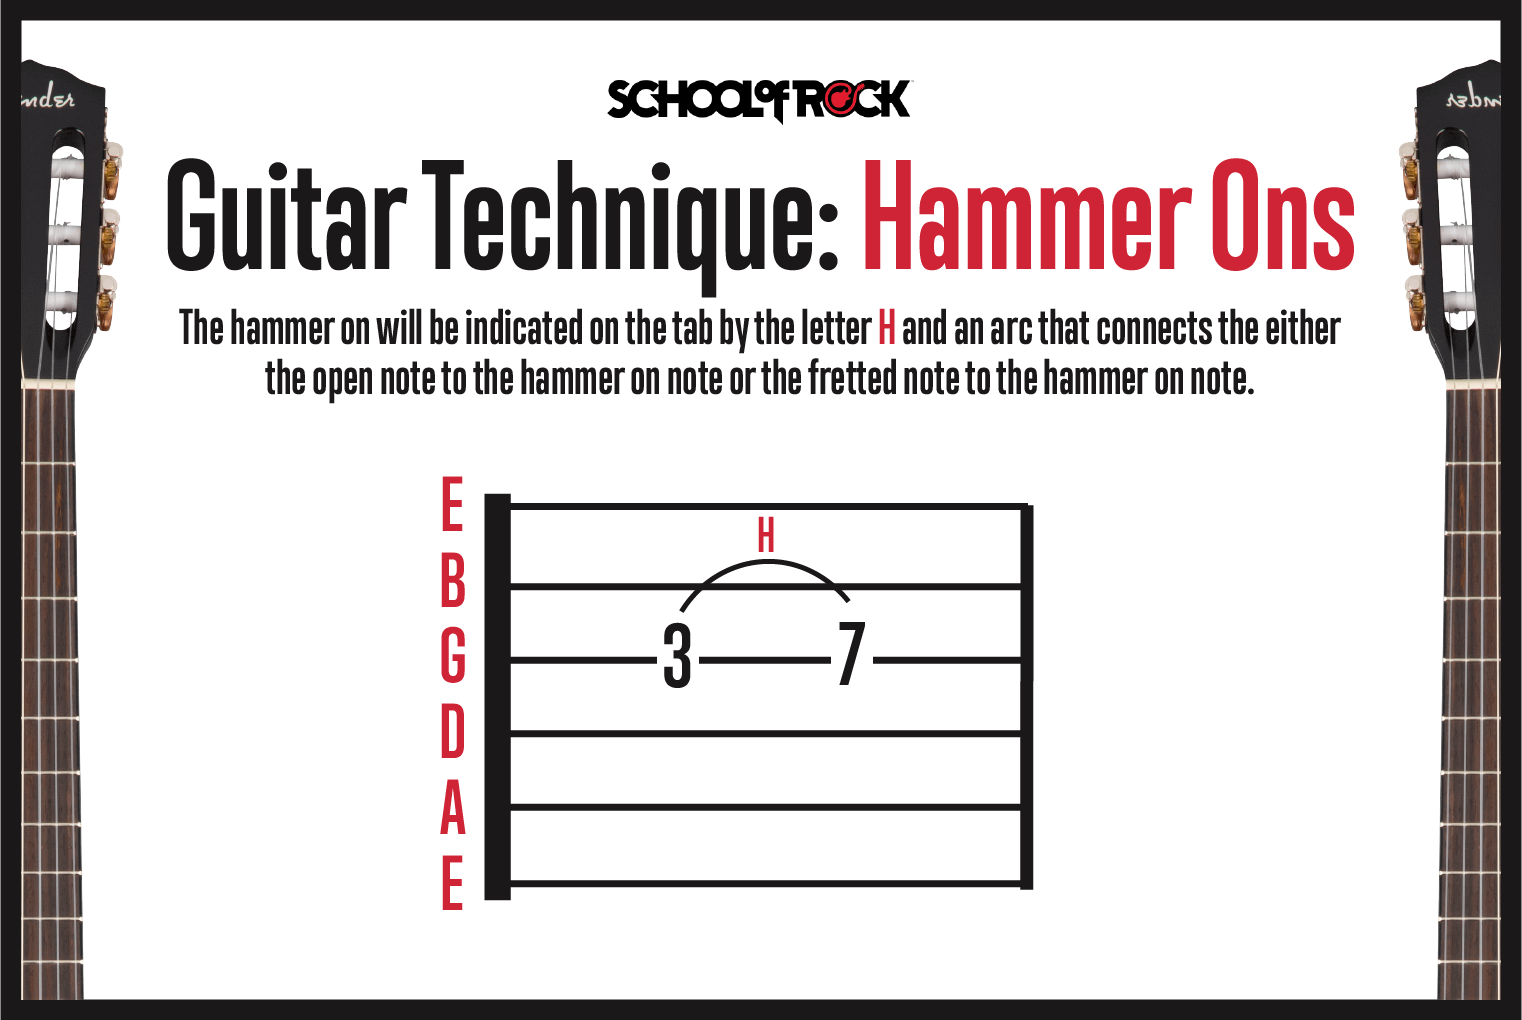
PLAYING HAMMER-ONS ON THE GUITAR
The hammer-on is a cool guitar technique where you don’t pick the note but you “hammer on” the note with your fretting finger. You can hammer on from an open note or a fretted note, and the resulting note will be higher. The hammer-on will be shown on the guitar tab by the letter “H” and an arc that connects either the open note to the hammer-on note or the fretted note to the hammer-on note.
HOW TO PLAY HAMMER-ONS ON THE GUITAR
To play a hammer-on, strike the guitar string with the fretting finger with enough force to sound the note. This will take a little practice to produce a clear, strong note. It is also easier to play on the electric guitar with a decent amount of volume. Start with your open low E string and hammer onto the third fret, holding the note to let it ring. Repeat this on different strings and different frets.
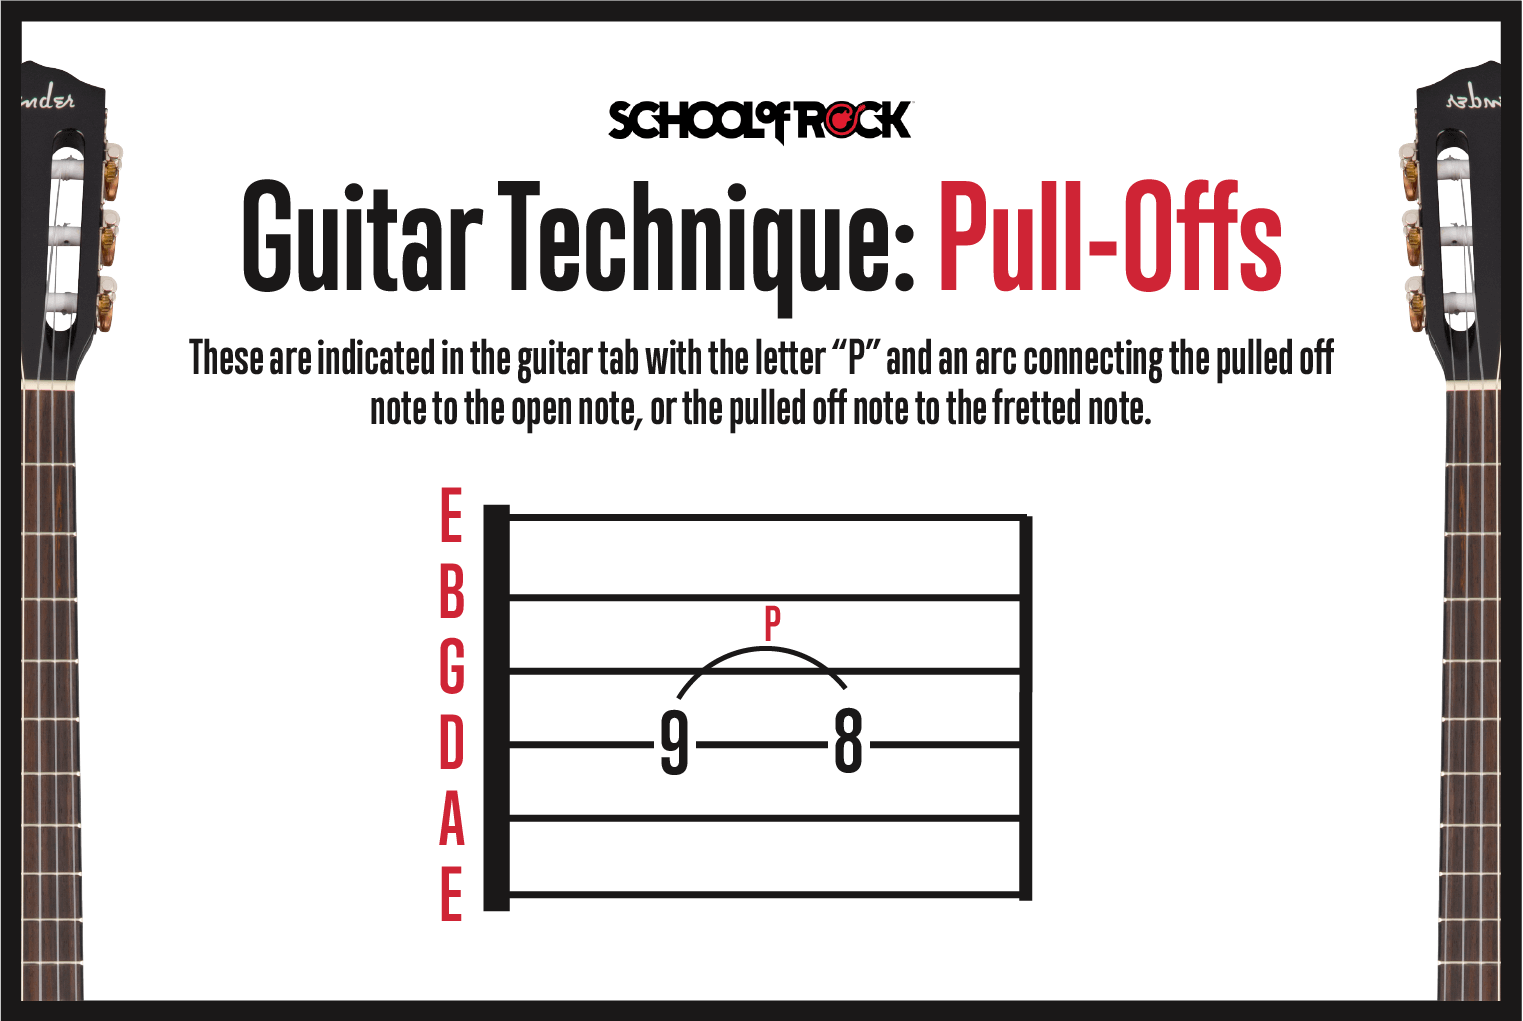
PLAYING PULL-OFFS ON the GUITAR
Pull-offs are the exact opposite of the hammer-on. Instead of pushing down on the string, you pull off the string to an open note or a note you are fretting with another finger. These are shown in the guitar tab with the letter “P” and an arc connecting the pulled-off note to the open note, or the pulled-off note to the fretted note. The resulting note will be lower.
HOW TO PLAY PULL-OFFS ON the GUITAR
To execute the pull-off, you will press the note down and then pull off the note to play either an open or fretted note that is lower. When playing pull-offs on the guitar, you are “grabbing” enough of the string with your fingertip to make the note sound.
You can then combine the two techniques to play a combination of both hammer-ons and pull-offs by repeating the two motions in an alternating fashion. This is sometimes also referred to as a “trill”.
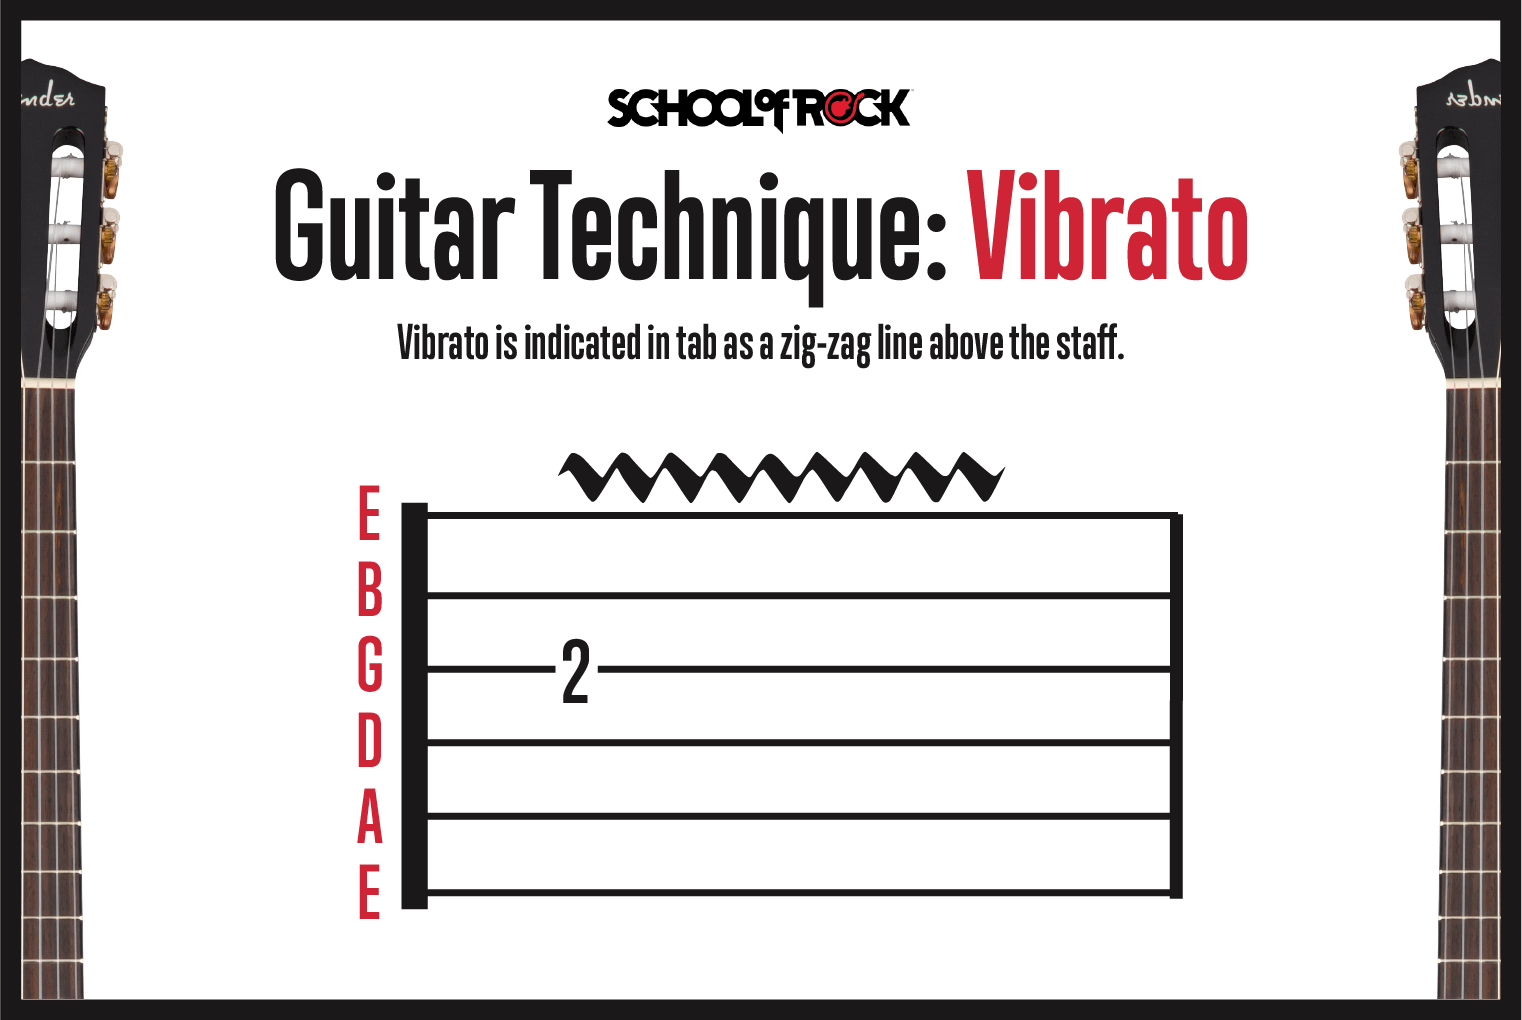
PLAYING VIBRATO ON THE GUITAR
Vibrato is the technique of repeatedly bending a note and returning to the original pitch without releasing the note. This produces an expressive note and tone, and vibrato is shown in the guitar tab as a zig-zag line above the staff. When learning how to read guitar tablature, beginners should look at the length of the line for the vibrato. In general, the longer the line, the longer you should apply the vibrato.
HOW TO PLAY VIBRATO ON the GUITAR
Vibrato is like bending, but it does not change the pitch as much. You can add vibrato using a single finger, or by using a main finger with other fingers as support. Start with a smooth, slow vibrato, and vary the speed for different effects. Like bending, vibrato adds a vocal quality to soloing, and no two guitarist’s vibratos are the same: they are as individual as a fingerprint.
TAPPING GUITAR
Tapping is a popular technique that involves fretting notes with your regular fretting hand while also “tapping” or fretting notes with the index finger of your picking hand. The tapping of your picking hand is a variation of a hammer-on. Tapping is notated in the guitar tab by a letter “T” over the indicated note.
HOW TO FINGER TAP GUITAR
Tapping was popularized by Eddie Van Halen, but the technique has been used in classical guitar for decades. To finger tap on the guitar, fret a note with your “regular” fretting hand and “tap” a higher note on the same string with your index finger on your picking hand.
Finger tapping is like the hammer-on technique, but instead of your fretting hand, you are using your picking hand. This allows you to play the guitar notes with wide intervals that you cannot reach with just your fretting hand.
Playing with a decent amount of gain and volume will also make this technique easier and sound better. It also allows you to play very quickly since you are fretting notes on the guitar with both hands.
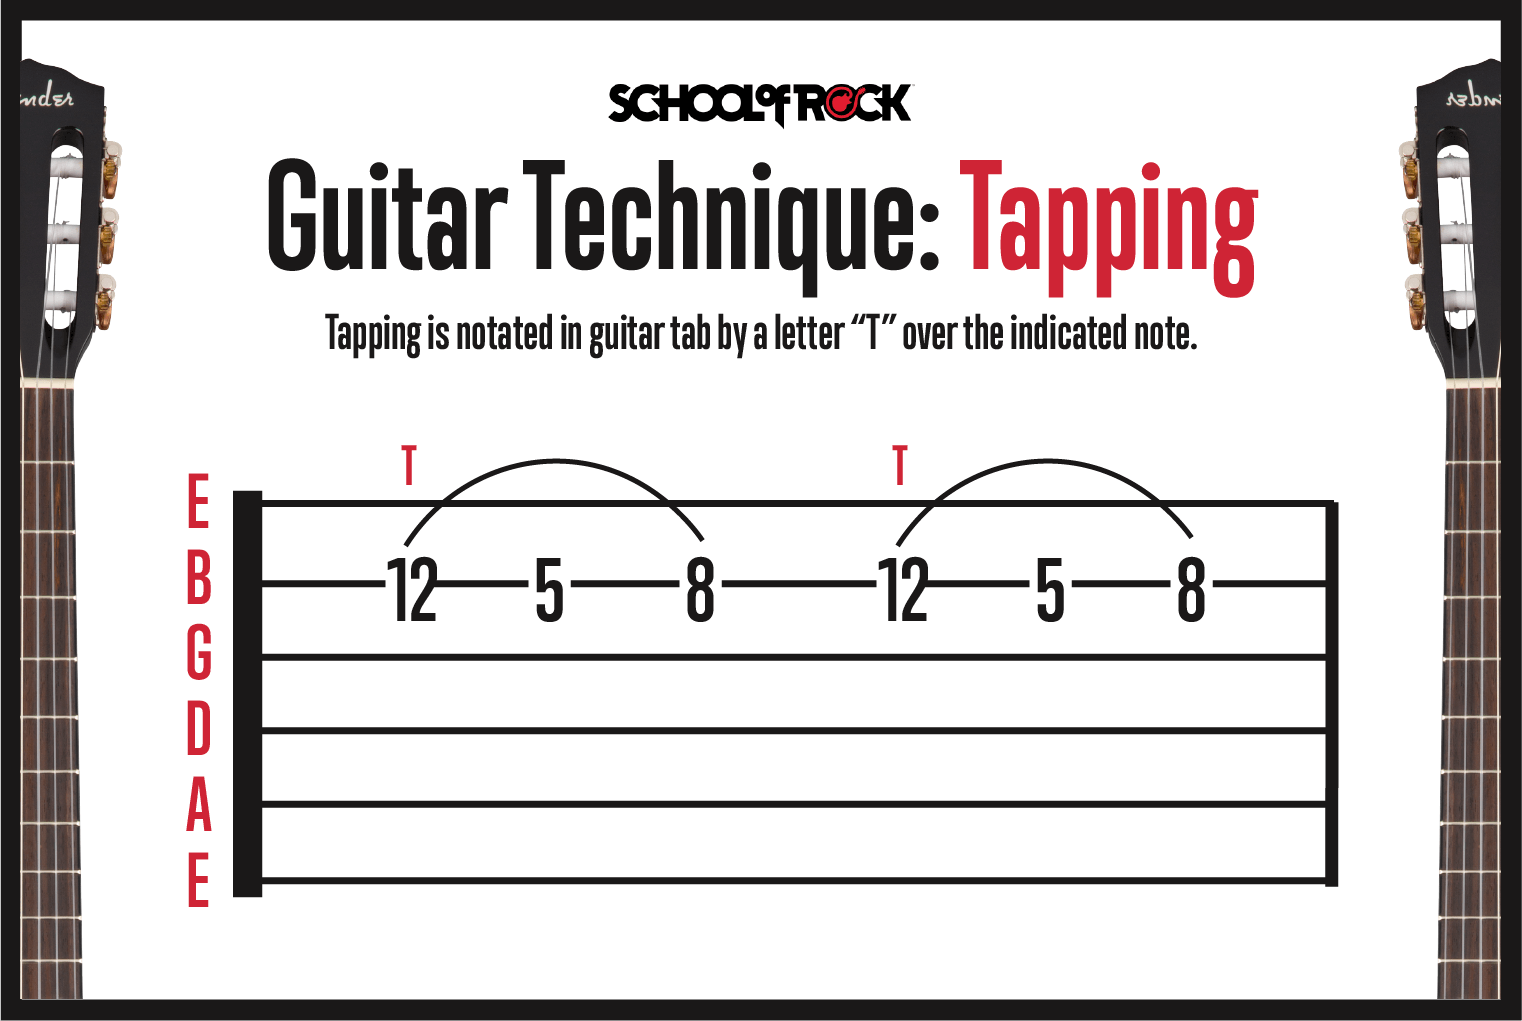
GUITAR TECHNIQUE: TWO-HANDED TAPPING
Two-handed tapping is as the name implies: a technique where both hands will play notes independently without picking the guitar notes. To achieve this, both the fretting and picking hands hammer on notes. This is sometimes done with the fretting hand tapping the bass notes and the picking hand tapping the melody or solo notes.
STRUMMING GUITAR NOTES
When strumming chords on your guitar, there are two types of strokes used: upstrokes and downstrokes.
Downstrokes start on the lower strings of the guitar and end with the higher strings while using a downward motion. In the guitar tab, downstrokes are shown by a tablature symbol that has a thick horizontal line with two “legs” pointing down on both sides.
Upstrokes are the opposite and start on the high strings and end on the low strings using an upward motion. In guitar tablature, upstrokes are notated by a “V” shaped tablature symbol.
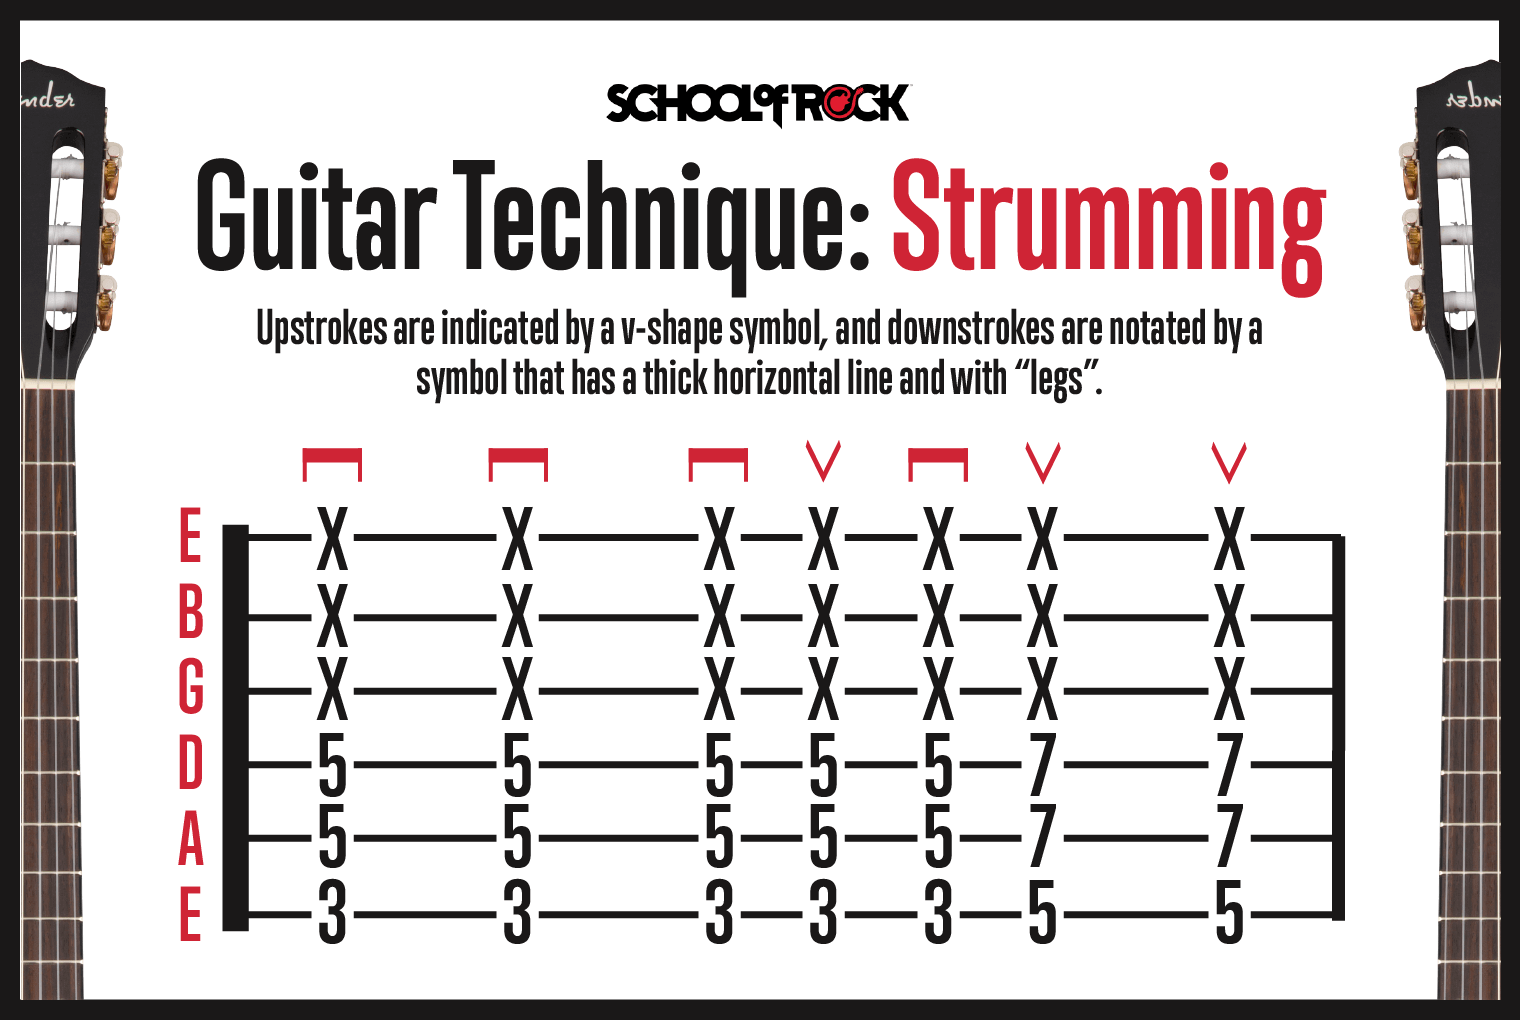
HOW TO STRUM GUITAR NOTES
When playing chords on a guitar, various strumming patterns are used depending on the rhythm of the song. You can strum in a constant downstroke and upstroke pattern, or any combination. Songs with an ⅛ note rhythm are counted as: “one, and, two, and, three, and, four, and, one, and, two, and, three, and, four, and...” Many songs use alternating upstrokes and downstrokes in an ⅛ note rhythm with the downstrokes on the 1, 2, 3, 4 and the upstrokes on the “ands”.
GUITAR TECHNIQUE: PLAYING DOWNSTROKES AND UPSTROKES
When playing single notes in the guitar tab, the same notation of upstrokes and downstrokes applies. Your pick will go downward as you pick the note and are shown by the thick horizontal bar with “legs” pointing down on both sides. Conversely, upstrokes are played with an upward motion of the pick and are notated with a V above the note to be played.
READY TO LEARN OTHER GUITAR TECHNIQUES?
Now that you know how to read tabs for guitar and what guitar techniques you can play, you’re ready to start playing. From beginner to advanced, School of Rock has taught thousands of students how to play guitar and achieve their full potential. From strumming to tapping, our instructors have the knowledge and experience to help you quickly play your favorite Rock songs on stage.
Ready to look for guitar tabs? From easy songs for beginners to fast-paced pieces for experienced musicians, School of Rock has our students covered. With a vast catalog of high-quality guitar tab sheet music to choose from, our students can get unlimited access to our growing library at Sheet Music Direct.